
Posted July 23, 2023 — Updated November 23, 2024
There’s a new wgrib2 version for 2025 – version wgrib2 3.7. View the install tutorial . This version is easier to install than past versions.
Links to all four versions of my install tutorials are here.
This tutorial is for MacOS *Intel* Big Sur – Monterey – Ventura
and M1- M3 Apple Silicon systems migrated from Intel including Sonoma. I have also had success with Intel Macs upgraded to Sonoma using Open Core Legacy Patcher. Most importantly, the files we’ll be installing will be placed in the /usr/local/bin/ directory.
For New, Clean Apple Silicon M1-M3 computers/systems not migrated from Intel machines and using Ventura or Sonoma, use this newer tutorial posted 2/2024. (These files will be installed in the /opt/homebrew/bin/directory.)
Updated 07-27-2023 with advise for compilation error v3.1.2
Updated 02-05-2024 to include change for wgrib2 version 3.1.3
Updated 07-02-2024 — As of Spring 2024, Homebrew now installs gcc version 14 as its default. (People are having issues with gcc 14. ) I have changed the tutorial to have Homebrew specify an older compatible version, ” install gcc@13” as the gcc version to be installed. As of this writing this command will install gcc-13.3 and it may appear in your folder as gcc-13.
Updated 07-05-2024 – I’ve modified my install instructions to be explicit about the Homebrew $PATH variable in .bash_profile file. I’ve also changed the method to check on the on gcc version and the directory it’s in to avoid confusion.
Updated 07-05-2024 – Compilation Errors- Missing library errors Several users have had compilation errors on machines with previously installed weather and scientific programs like GrADS and older copies of gcc. These programs have installed their own dependency libraries that appear to interfere with with wgrib2 compilation or their $PATH variable is not correct. The issue is a change with Homebrew and its $PATH variable. Explained here.
As a test I removed a working copy of wgrib2 from an old laptop that also had GrADS installed and tried to reinstall wgrib2. I, too, had compilation errors. )
I tried my usual “tricks”. None worked.
The solution with recurrent compilation errors:
- Make two backup copies of your Mac. (Time Machine, Carbon Copy Cloner, SuperDuper)
- Boot in Recovery Mode (Command-R for Intel Macs)
- Erase and Reformat your computers’s Macintosh HD
- Reinstall Sonoma using Recovery Mode
- Boot the new Sonoma. Hold off on logging in to your iCloud account.
- Make sure Terminal has Full Disk Access under Privacy Settings.
- Change Terminal to use bash shell (enter chsh -s /bin/bash)
- Follow all the instructions below to install wgrib2
- After successful install, Use Migration Assistant to restore from your backup. Do NOT allow Migration Assistant to restore System Files by deselecting it from the list of file types to be copied by Migration Assistant.
- When asked to provide a new user name, be sure to select these new user options: merge your old user with new user and keep old files in a separate folder.
Yes, it’s a lot of work to fully erase, install, compile, restore, but it guarantees success in installations that fail.
Instructions for Installing wgrib2
v 3.1.1 thru 3.1.3
Intel & Apple Silicon Migrated Systems from Intel
(These utilize a /usr/local/bin directory)
Introduction to wgrib2 utility – About wgrib2
To work efficiently with very large weather GRIB2 data files, the wgrib2 utility was developed by several NOAA data scientists, especially Wesley Ebisuzaki. It is an essential command line-based C and fortran-based program used to index and manipulate weather data grib2 files.
Most commonly, it’s used to extract specific weather parameters and to create GRIB2 files that cover smaller geographic areas.
Most applications a Mac user might use are graphical interface based (GUI) and are already compiled by the app’s developer; they just need to be installed on your Mac.
wgrib2, on the other hand, runs on the Mac’s underlying Unix -Darwin foundation and its operation is dependent on your Mac’s specific directory structure and the versions and locations of other code libraries (“dependencies”) installed on your Mac.
As a result, wgrib2 is supplied as as folder of code, scripts, and code libraries that are downloaded and then compiled for your specific machine before it is able to run. This tutorial will explain how to do this.
From my previous install/compile tutorial, installing wgrib2 on a Mac used to be a very complex and tedious adventure, fraught with problems, starts and stops. But it could be accomplished.
I’m happy to report that wgrib2 (now in version 3.1.3 ) can now be installed and compiled relatively easily on an Intel or Apple Silicon Mac.
A special thank you to a reader, “Davis Zhang“, who alerted me to me to the existence of a brief Japanese language install guide which showed that wgrib2 version 3.x can now be installed with a significant reduction in complexity on the latest versions of Mac OS.
I’ve successfully installed wgrib2 v. 3.1.3 on an Intel Mac running Monterey on an Apple Silicon M-1 Mac running Ventura using the instructions I will be providing below.
As was the case my previous install/compile tutorial, this tutorial is designed for true novices with limited experience using Terminal and command lines. It’s probably more detailed than many people need, but I’m sure there are some of you that will appreciate the hand-holding.
Overview of the steps
- Download wgrib2 from the NOAA web site; rename the folder
- Uncompress or ‘untar’ the wgrib2 download
- Download and install Apple Developer Tools
- Download HomeBrew package installer needed to install required library “dependencies”
- Using HomeBrew, install various library dependencies – gcc, gfortran, cmake. Confirm proper directory structure and PATHs using ‘brew doctor‘ command. Check specific version of gcc installed.
- Edit the script called ‘makefile‘
- Move a copy of your grib2 folder to the directory: /usr/local/
- Run the ‘makefile‘ script using a Terminal command to compile wgrib2 into an executable.
- Create a symlink of the installed wgrib2 in your /usr/local/bin/ directory so that it can easily be called using Terminal.
So here we go—
1- Download wgrib2 from the NOAA web site
The latest versions of wgrib2 code from NOAA and many README documents are available from this web site:
https://www.ftp.cpc.ncep.noaa.gov/wd51we/wgrib2/
As of this writing, the latest version is 3.1.2. (Download the version WITH libraries)
Updated 02-05-2024— I recommend using version 3.1.3.
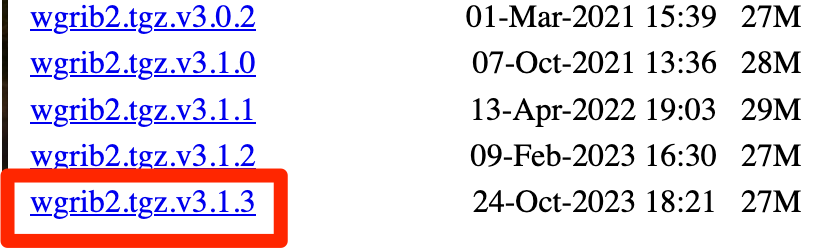
You’ll likely find the wgrib2.tgz.v3.1x package in your Downloads folder.
Move the wgrib2.tgz.v3 file from your Downloads folder to your Desktop
2-Uncompress the wgrib2.tgz download
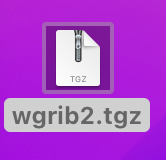
On your Desktop, rename the wgrib2.tgz.v3.1.3 file to simply wgrib2.tgz by right clicking or option-clicking on the file and select rename. Confirm yes when it asks you to change the file type. This should be the filename—
After renaming the file, double click on the wgrib2.tgz file. The file should untar (unzip, uncompress) and a folder called grib2 will be on your Desktop.

We’ll get back to this folder shortly.
3-Download and install Apple Developer Tools
You may have X-code already installed on your computer. If so, you will still need to install Apple Developer Tools.
Launch Terminal (in your Applications/Utilities Folder )
enter the following command and press return
xcode-select --install
After Developer Tools downloads and installs, it will launch. You MUST agree to the terms of the license agreement or things won’t go well.
Verify that you’ve successfully installed Xcode Command Line Tools using Terminal by entering this command and press return
$ xcode-select -p
You should see a confirmation showing where it’s installed
/Library/Developer/CommandLineTools
If you’re a novice, I strongly recommend that you quit Terminal after each major step and then restart the Terminal program. It avoids certain issues of being in the wrong directory, etc.
4- Download and Install HomeBrew
Homebrew is a “package installer” and is used to download and install certain dependency libraries of code, used by many utilities including wgrib2. We’ll be using Homebrew to install the dependent compiler packages such as gcc, gfortran and cmake.
Go to https://brew.sh/ and follow the relatively simple instructions to install HomeBrew by copying a command from its web site home page, then opening your Terminal program and pasting the copied command into the Terminal window.
•Copy the install command from the Homebrew web site.
•Paste it into Terminal.
Homebrew will install.
4a – Continue here after installing Homebrew.
Immediately after installing Homebrew, we need to modify the .bash_profile $PATH variable.
- Quit Terminal.
- In Finder, go to your main user directory (folder). That’s the one with your computer name.
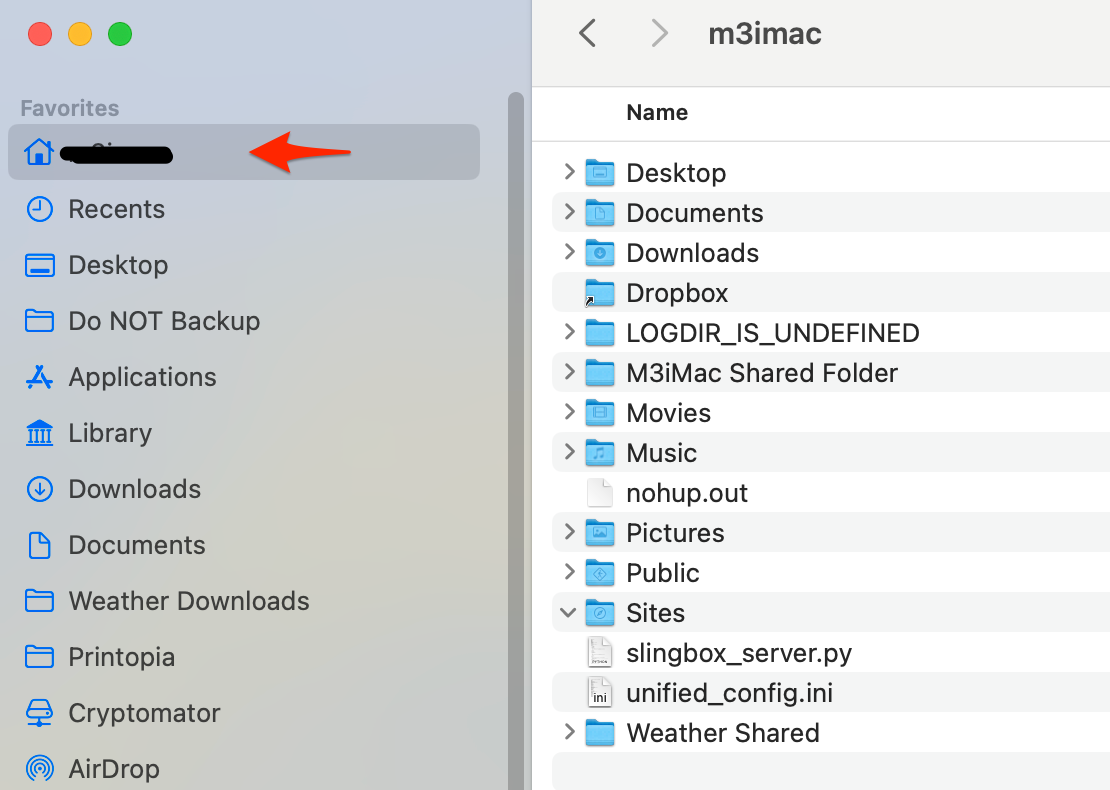
- With the window open, enter Command-Shift-Period This command will display invisible files (those beginning with a (.) period
- You’ll see something like this —
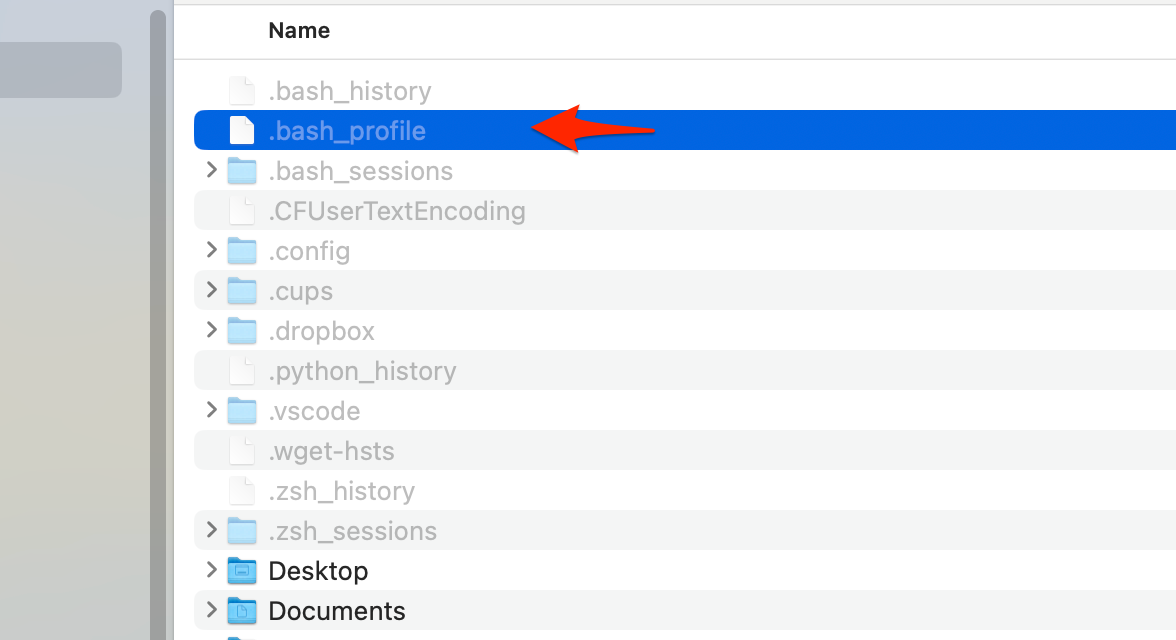
- Open the greyed out .bash_profile file with TextEdit or BBedit, by right-clicking on the file name and selecting “Open with….”
- Using TextEdit or BBedit, edit this file by copying and pasting the following text at the top of whatever text is in there. —
For Ventura or Sonoma and Apple Silicon, copy and paste this text:
eval "$(/opt/homebrew/bin/brew shellenv)"For Monterey, Big Sur and Intel Macs, copy and paste this text:
PATH=”/usr/local/bin:$PATH”
- Save the change you just made to the .bash_profile and close the file.
- With the same Finder window still open, Don’t forget to enter Command-Shift-Period again to hide those invisible files.
FYI- There’s an another way to make this edit of the .bash_profle with a Terminal command—
Monterey, Big Sur and earlier – specifically Intel Macs
echo 'PATH="/usr/local/bin:$PATH"' >> ~/.bash_profile
For Ventura and Sonoma – specifically Apple Silicon
(use your computeruser name in place of yourusername)
echo 'eval "$(/opt/homebrew/bin/brew shellenv)"' >> /Users/yourusername/.bashprofile
    eval "$(/opt/homebrew/bin/brew shellenv)"
However, we’re doing the TextEdit way above to actually be able to see what the default $PATH is. More importantly, we can make sure it’s the first or only text in this file.
4 b- Continue with Installation
Open Terminal again. Following install of Homebrew, Run the following command in Terminal after Homebrew finishes installing:
which brew
Terminal should respond with /usr/local/bin/brew
Continuing…..
Following Homebrew installation, enter the command below in Terminal and press return
brew doctor
This will check that everything is in its proper place. It will also do tests that may alert you to issues that may affect compilation and install of wgrib2. Running this command may result in recommendations of other commands to fix links, symlinks and conflicts. I do suggest that you follow its recommendations and fix things it finds.
You can run “brew doctor” any time again to see other recommendations. Using the Terminal File Menu, you can open a second window in Terminal to copy and paste HomeBrew’s recommendation commands to fix and solve any issues.
5-Using HomeBrew, install various library dependencies – gcc, gfortran, cmake
Updated 05/25/24 Several people this month ran into compilation errors. It appears that Homebrew is now installing gcc version 14 as its default. I have not confirmed this, but there may be a compatibility issue with gcc-14 and wgrib2. We’re going to use a known compatible version.
Previous instructions had the command “brew install gcc”.
Instead, see the instruction below to install gcc-13
Now we’re going to install specific libraries that wgrib2 compilation will need.
Install gcc (installs gfortran automatically at the same time)
Open Terminal
Enter the command below in Terminal and press return
brew install gcc@13
gcc-13 should then be installed.
Check to see where it’s installed, enter the following command in Terminal and press return—
which gcc
and terminal should show this, if gcc is installed:
/usr/local/bin/gcc
(Installation of gcc includes automatic installation of gfortran.)
To check to see where gfortran was installed, enter the following command in Terminal and press return—
which gfortran
and if it’s installed, Terminal will reply:
/usr/local/bin/gfortran
Install cmake
Finally, we’ll use HomeBrew to install cmake.
Enter the command below in Terminal and press return—
brew install cmake
It should be installed and you can check using the “which cmake’ command.
13.
5-a Intentionally Duplicate Files in /usr/local/bin
In the Finder use the Go Menu to select Go to Folder—
Enter the path to the folder as this
/usr/local/bin
You will see gcc-13. Click on it and use the Duplicate command to make a copy of this file in place. Name the copy just gcc. So you end up with gcc and gcc-13 in this directory.
You will also see gfortran or maybe gfortran-13. Click on whichever is present and Duplicate it and rename the copy so that you have both gfortran and gfortran-13.
So you should have these symlinks in the /usr/local/bin/ folder —
gcc
gcc-13
gfortran
gfortran-13.
Below is what your folder might look like—
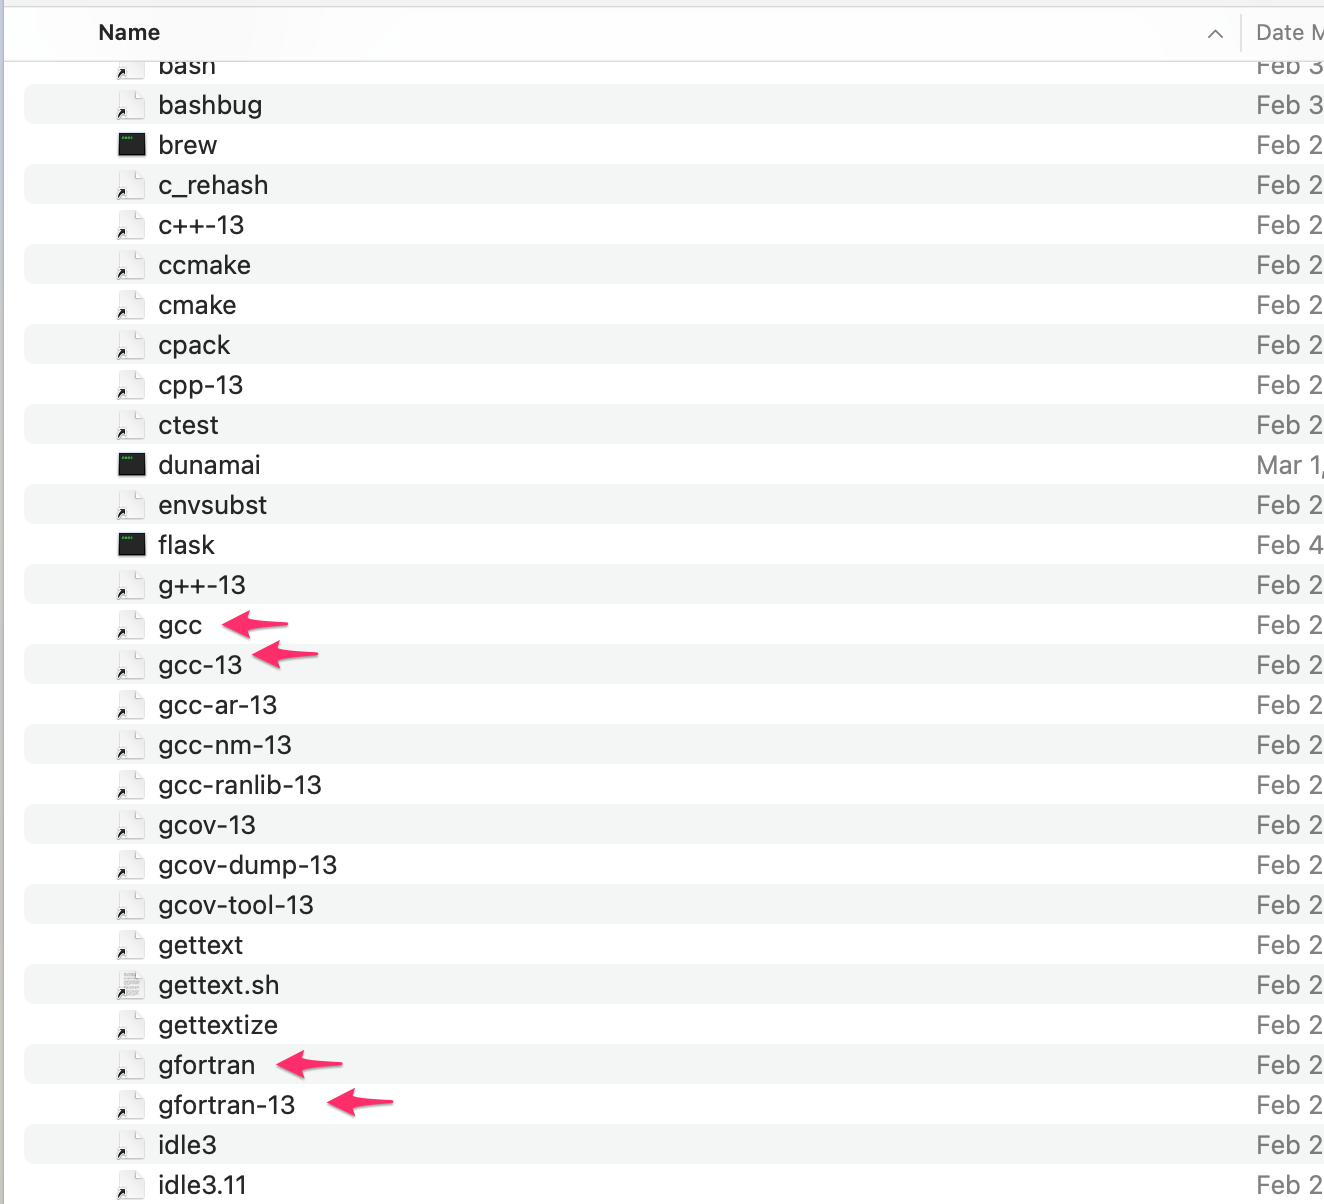
IMPORTANT When we modify the the ‘makefile’ file script, be certain to use the version that was installed in your computer. (gcc-13)
So to this point, we’ve installed Apple Developer Tools, gcc gfortran and cmake.
–> Now we’re going to return to the grib2 folder that’s on your Desktop that we had uncompressed earlier.
6-Edit the wgrib2 installer “makefile”
In the Finder, go to the folder grib2 downloaded and uncompressed earlier on your Desktop.
Open the grib2 folder on your Desktop. Inside you’ll see a file called ‘makefile‘.
We’re going to edit this the file using a text editor application.
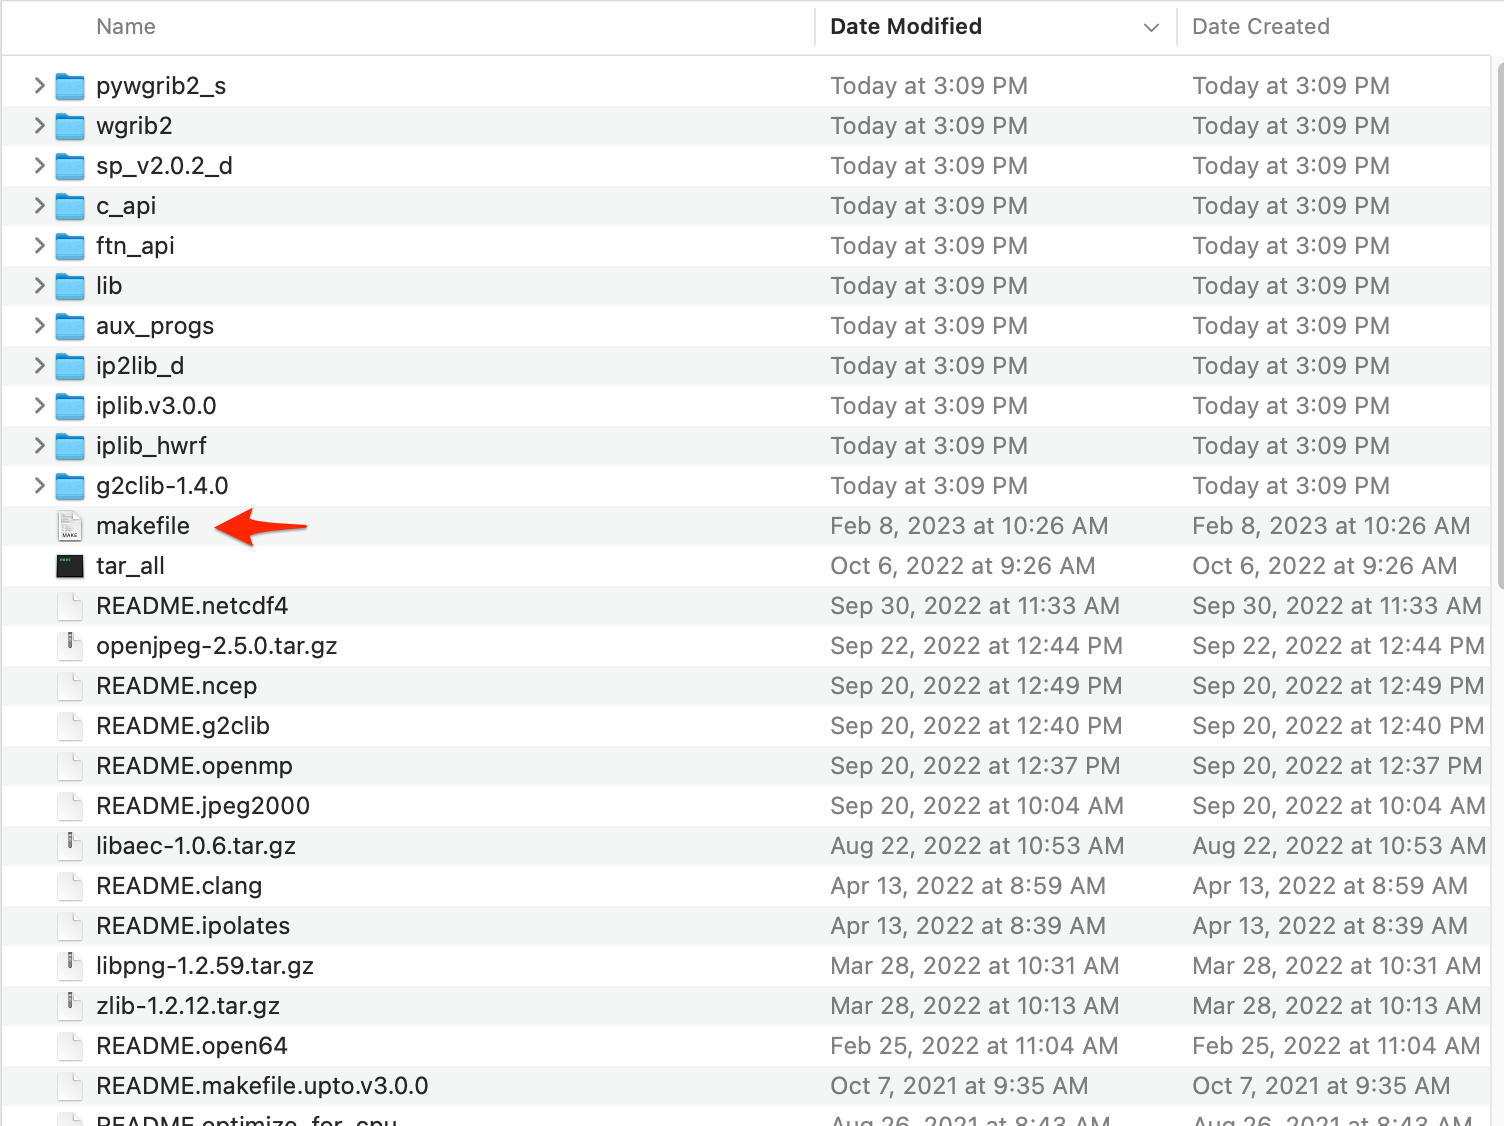
Using any text editor, open the ‘makefile‘ file. Right click on the file and select “open with”. You can use TextEdit. I’ll be using BBedit to edit the makefile —
About line 154 or so (depends on the wgrib2 version) you will find under #Main development platform: linux with gcc/gfortran:
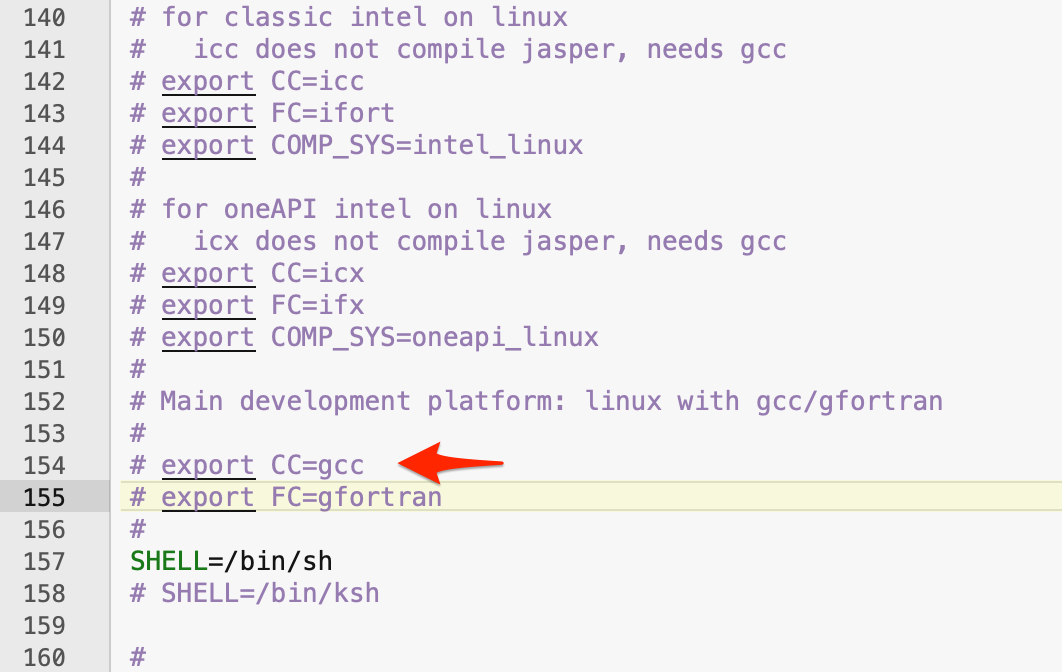
We are going to make the two lines referring to gcc and gfortran here active (by uncommenting) the lines (meaning, removing the preceding hashtag -#-) and editing to indicate the version of gcc that was installed with HomeBrew earlier.
Using your text editor, change these two lines:
# export CC=gcc
# export FC=gfortran
to this:
export CC=gcc-13
export FC=gfortran
Notice that the leading # has been removed from each line and the version number of gcc installed by Homebrew (gcc-13) has been edited in.
There are two more line changes that need to be made in this makefile for wgrib version 3.1.3—
• Change– USE_PROJ4=1 to USE_PROJ4=0
ALSO:
• Change– USE_PNG=1 to USE_PNG=0
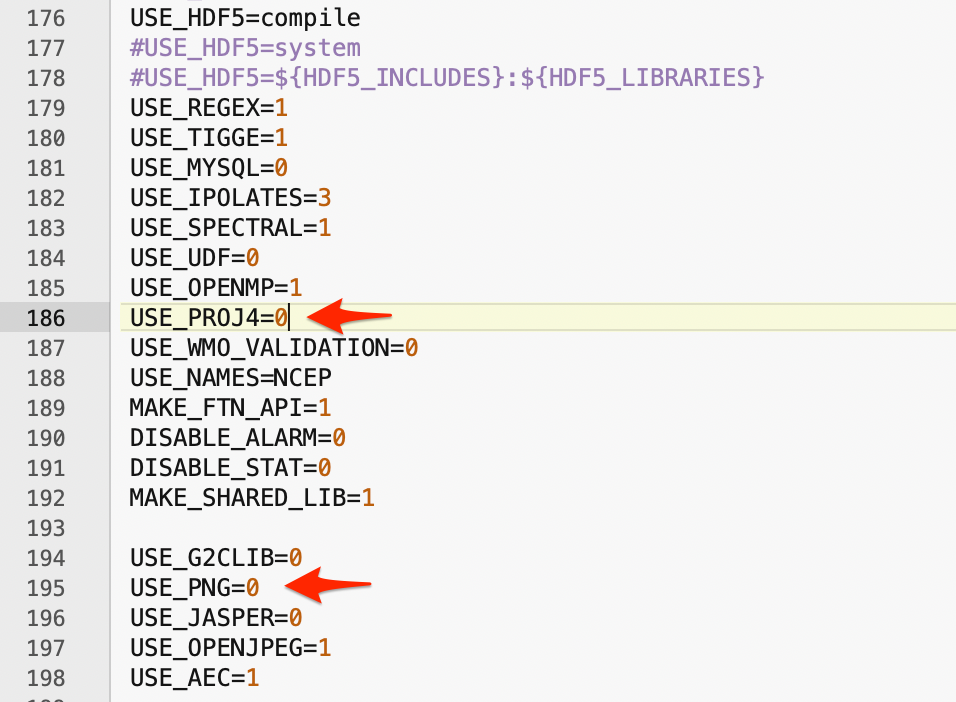
–>When the edits have been completed, remember to SAVE the changes to the makefile from your text editor’s File menu.
Now close the grib2 folder on your Desktop.
7- Copy your grib2 folder and paste to /usr/local/
Using the Finder, select the grib2 folder on your Desktop and select the Copy command from the Edit Menu, or use the Command-c shortcut to copy the entire folder.
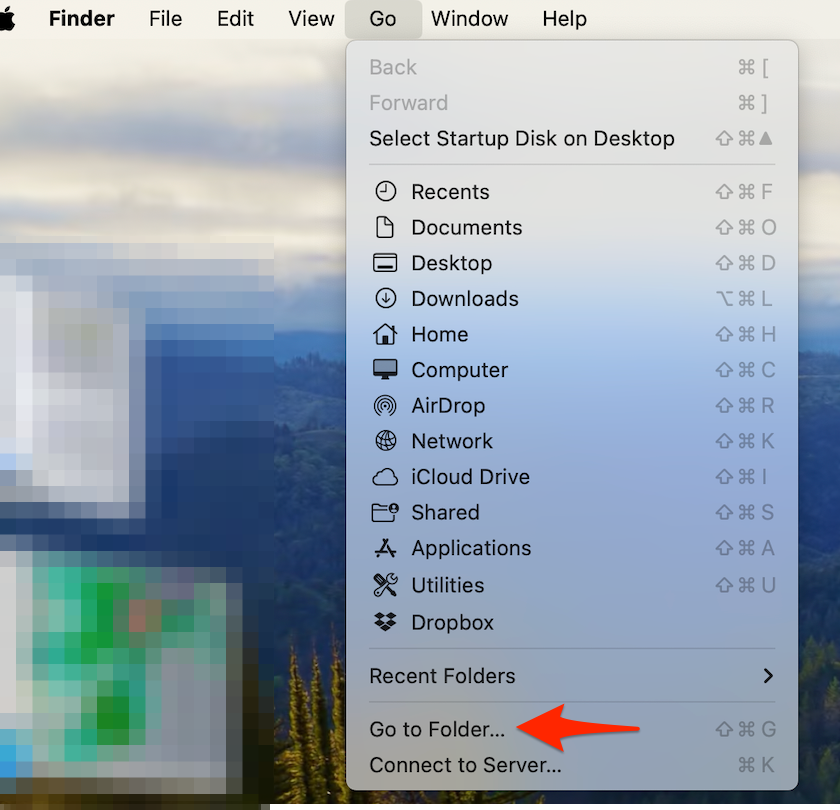
Using another command from the Finder, select the Go Menu and select Go to Folder…
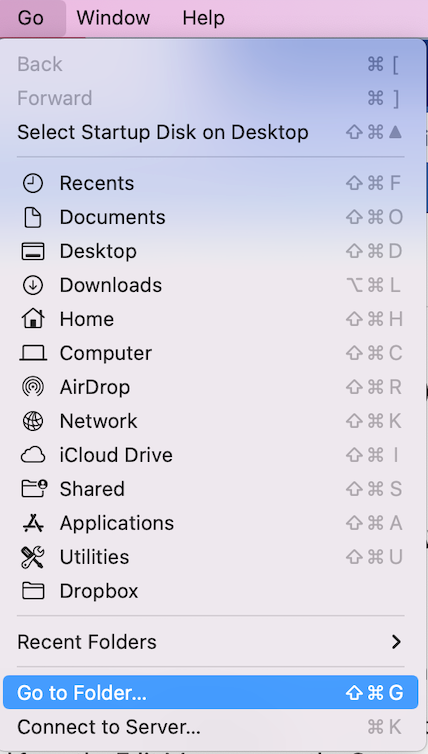
Enter this path:
/usr/local/
This will show a normally hidden folder on your Mac, the /usr/local/ folder.
PASTE the grib2 folder that you copied from Desktop into this folder. (Command -v)
After pasting, you should see a copy of the grib2 folder in that /usr/local directory—

We’re almost there!
8- Run the ‘makefile’ compiler script in super user mode.
We’re ready to compile and install wgrib2.
Make sure you’re running as an administrator level user on your Mac.
Open Terminal.
Enter the following command and press return:
cd /usr/local/grib2/
Then enter the following command and press return:
sudo make
You’ll be prompted for your user password. Enter it and press return.
You should see a bunch of gibberish scroll past on the Terminal window as it compiles and installs. It may take as much as 10 or more minutes for it to complete. Longer is usually a good sign.
When it completes, it should NOT have any error messages at the end. If it was successful, it won’t tell you. You just won’t see any errors at the end.
If you see error messages at the end, something is amiss. I’ll explore troubleshooting in another tutorial.
9- Create a Symlink
Quit Terminal. Restart Terminal again
We’re going to create a symlink in your /usr/local/bin folder so that Terminal can easily call wgrib2.
Enter the following command in Terminal and press return:
sudo ln -s /usr/local/grib2/wgrib2/wgrib2 /usr/local/bin
Enter your user password when prompted. Press return.
A symlink will have been created.
Now, let’s check if wgrib2 has been installed.
In Terminal, enter the following command in Terminal and press return—
which wgrib2
You should see the response
/usr/local/bin/wgrib2
To see what wgrib2 can do, just enter this in Terminal and press return:
wgrib2
You should see all the commands wgrib2 can accept scroll in the Terminal window.
To see wgrib2 in action, use the terminal command on any .grib2 file you have to see its message contents—
wgrib2 -s mygribfile.grib2
Use of wgrib2 is an entire other tutorial.  Look for it in coming months.


Use the tips found here to use wgrib2— https://www.ftp.cpc.ncep.noaa.gov/wd51we/wgrib2/tricks.cheap

see the "tricks" links at

https://www.ftp.cpc.ncep.noaa.gov/wd51we/wgrib2/
Per private email exchange with Wesley Ebisuzaki, apparently v3.1.2 was a special case for the UK Met Office and their need for aspherical equal area Lambert projection.
To solve compilation issues, just install version 3.1.1 -OR- if you want to try to install 3.1.2, add the following edits to the makefile (when you make the changes to specify CC=gcc-13 and gfortran.)
change
USE_PROJ4=1
to
USE_PROJ4=0
to Install, run the commands:
makeclean
make
Need Help with an Installation?
Use this Feedback form to email me.
Include your email address and the following information:
• Are you using Intel or Apple Silicon (M1 etc) ?
• What Mac system version are you using?
• Is this a new, clean install machine or was it migrated from another Mac?
• Had you previously installed HomeBrew for other software?
• Which directory is Homebrew installed in ? /usr/local or /opt
• Is there an existing /usr/local/ directory?
• Did you run the command brew doctor to make sure your symlinks are correct for homebrew? (You can run it several times to fix everything.)
• What version of gcc did you install?
• Did you make all the changes needed in the makefile compiler script —
Change- USE_PROJ4=1 to USE_PROJ4=0
Change- USE_PNG=1 to USE_PNG=0
#wgrib2 #install wgrib2 on MacOS
Hi. I got this error when compiling
gcc-13: error: unrecognized command-line option ‘-V’
Any idea to solve this? Thank you.
It’s best to send me these questions via the Feedback email form with the following information: (The link is right above this comment area.)
Version of wgrib2 you’re trying to install
Version of MacOS you’re using.
Did the error occur early in the compilation process or towards the end?
Did you run the command ‘brew doctor’ before attempting the installation?
Make sure you made the edits of the makefile properly.
Did you remove the leading # in the makefile edit CC=gcc-13 ?
Check that you have a gcc-13 file in your usr/local/bin directory.
Did you see my green-box compilation error change just above? Try that change with a new copy of the grib2 folder placed in your user home directory.
Hi – Thanks for this. I’m getting the following errors. Any additional help is appreciated.
/bin/sh: ip2lib_d/config.h: No such file or directory
/bin/sh: /usr/local/grib2/ip2lib_d/config.h: No such file or directory
cp libaec-1.0.6.tar.gz tmpaec.tar.gz
cp: libaec-1.0.6.tar.gz: No such file or directory
make: *** [/usr/local/grib2/libaec-master] Error 1
Please use the feedback form at the bottom of the Apple Silicon clean install tutorial provide other info.
You might want to try installing again following the tutorial for older versions of Mac OS
Thanks. I sent the same comment by email. I had tried the instructions for older MacOS’ but ran into different complications. Then I found these updated instructions. I’m using an Sonoma 14.4 with M2 chip. I’m happy to revert to try previous instructions if that’s still the best course of action.
Remove all files you added that you thought were missing. Start over with a fresh copy of the edited makefile
Aha! Got it… I see the link to the three different sets of instructions. Ignore previous reply. Apologies! Thanks!
FYI, as of April 2024, Homebrew is installing version 13.1 of gcc.If the symlink to the Homebrew installed gcc in your /usr/local/ directory is now showing gcc-13.1, you must edit the “makefile” to be be “CC=gcc-13.1” instead of CC=gcc-13 You will get compile errors unless this is done.
Another ‘trick’ is to select the symlink in the Finder, duplicate it and renamed it gcc-13.1 and/or just gcc-13. You are allowed have several duplicate symlinks of gcc in your /usr/local directory. One of them needs to match the edit “CC=gcc ” of the makefile.
This way, the makefile edit will be guaranteed to match one of them and compile properly.