NEW! 12-05-2024
#wgrib2 #Installation #MaOS #Sequoia #Sonoma
(The tutorial on this page is somewhat outdated and installs wgrib2 version 3.1.3. The newest wgrib2 version is wgrib2 v 3.7. Links to all four tutorials, including the latest install tutorial for wgrib2 3.6 are here.)
There’s a new wgrib2 version for 2025 – version wgrib2 3.7. View the install tutorial . This version is easier to install than past versions.
These updated installation instructions should also work with Sonoma.
With the release of MacOS 15 (“Sequoia“), Apple has increased the stringency of the privacy and security protocols of MacOS, causing prior wgrib2 compilation approaches to fail.
With people reporting compilation errors, I was motivated to solve the issue with Sequoia. After much experimentation, I have solved the install issues and I have significantly updated the install instructions that follow below. The solution appears to be providing proper access permissions.
Note that these installation instructions have worked on an absolutely clean, pristine install of MacOS Sequoia.
From experience going back years to installs as early as El Capitan, I’ve found that installing on an existing Mac with previous installs of Homebrew and especially previous installs of conda/miniconda environments can present challenges to compilation success. It can work, but it’s less predictable.
So you can try this install with a non-pristine Mac running Sequoia migrated from a previous MacOS.
If you run into compilation errors, the solution may be as simple as editing the $PATH in your .bash_profile to allow the compilation to work, then restoring it back when completed.
Intel vs Apple Silicon
MacOS 15 Sequoia can be installed on some late model Intel Macs and of course, on Apple Silicon Macs M1-M4. Homebrew, a “package manager”, is used to install certain dependent code libraries.
Depending on whether your Mac is Intel or Apple Silicon, Homebrew will be installed in different locations.
For Apple Silicon Macs, the Homebrew executable will be installed here
/opt/homebrew/bin/brew
For Intel Macs, the Homebrew executable will be installed here—
/usr/local/bin/brew
Due to these differences, separate paths will be needed for Intel vs Apple Silicon. These will be provided as needed.
Tutorial Start:
Introduction to the wgrib2 utility
To work efficiently with very large weather GRIB2 data files, the wgrib2 utility was developed by a team of several NOAA data scientists, led by Wesley Ebisuzaki. It is an essential command line based C and fortran program used to index and manipulate weather data grib2 files.
Most commonly, it’s used to extract and manipulate specific weather model parameters, perform calculations, and to create GRIB2 files that cover smaller geographic areas.
wgrib2 is a low level command line application that runs on the Mac’s underlying Unix -Darwin foundation. The Terminal program is used to run wgrib2.
Its operation is dependent on your Mac’s specific directory structure and the versions and locations of code libraries (“dependencies”) installed on your specific Mac. As a result, you must compile the wgrib2 program based on these dependencies and the specific directory structure of your Mac.
wgrib2 is supplied as as folder of code, scripts, and code libraries that are downloaded in compressed form and then a compile script is run to put the program together.
This tutorial will explain how to do this.
As was the case my first install/compile tutorial and a more recent tutorial, this tutorial is designed for true novices with limited experience using Terminal and command lines. It’s probably more detailed than many people need, but I’m sure there are some of you that will appreciate the hand-holding.
These install instructions appear long and detailed. Don’t let that discourage you; the detail is designed to make things work for you. If you’re a whiz, just use the Overview steps below.
Overview of the wgrib2 Installation Steps
- Change the default Terminal shell to bash shell
- Give Terminal Full Disk Access in Privacy Settings
- Check the hidden .bash_profile file or create if missing
- Download and Install Apple Command Line Tools
- Download Homebrew package installer needed to install required library “dependencies”.
- Create Homebrew recommended links and $PATH changes.
- Give Homebrew Full Disk Permissions
- Using Homebrew, install various library dependencies – gcc, gfortran, cmake. Confirm proper directory structure and PATHs using ‘brew doctor‘ command. Check specific version of gcc installed.
- Download wgrib2 from the NOAA web site; rename the filename
- Uncompress ‘untar’ the wgrib2.tgz download
- Edit the compilation script called ‘makefile‘
- Copy and paste a copy of your modified grib2 folder to the directory appropriate directory (Apple Silicon or Intel )
- Duplicate and Rename the gcc symlink in the bin directory
- Run the ‘makefile‘ compilation script using a Terminal command to compile wgrib2 into an executable.
- Create a symlink of the installed wgrib2, adding it to so that it can easily be called using Terminal.
Let’s Get Started
1. Change Default Shell to bash
The Terminal program (Applications>>Utilities>>Terminal) on Sequoia uses something called zsh as the default shell language.
For this installation, we need to switch back to the older shell language called bash.
Use your Terminal application to switch its shell default.
Open Terminal. Copy, then paste this command at the Terminal prompt:
chsh -s /bin/bash
Then Press return. It will request your password. Press return again.
You MUST Quit Terminal to have the change activated.
If you re-open Terminal, your bash command prompts should now begin with $ (bash) instead of % (zsh)
2. Change Terminal Disk Access Permissions
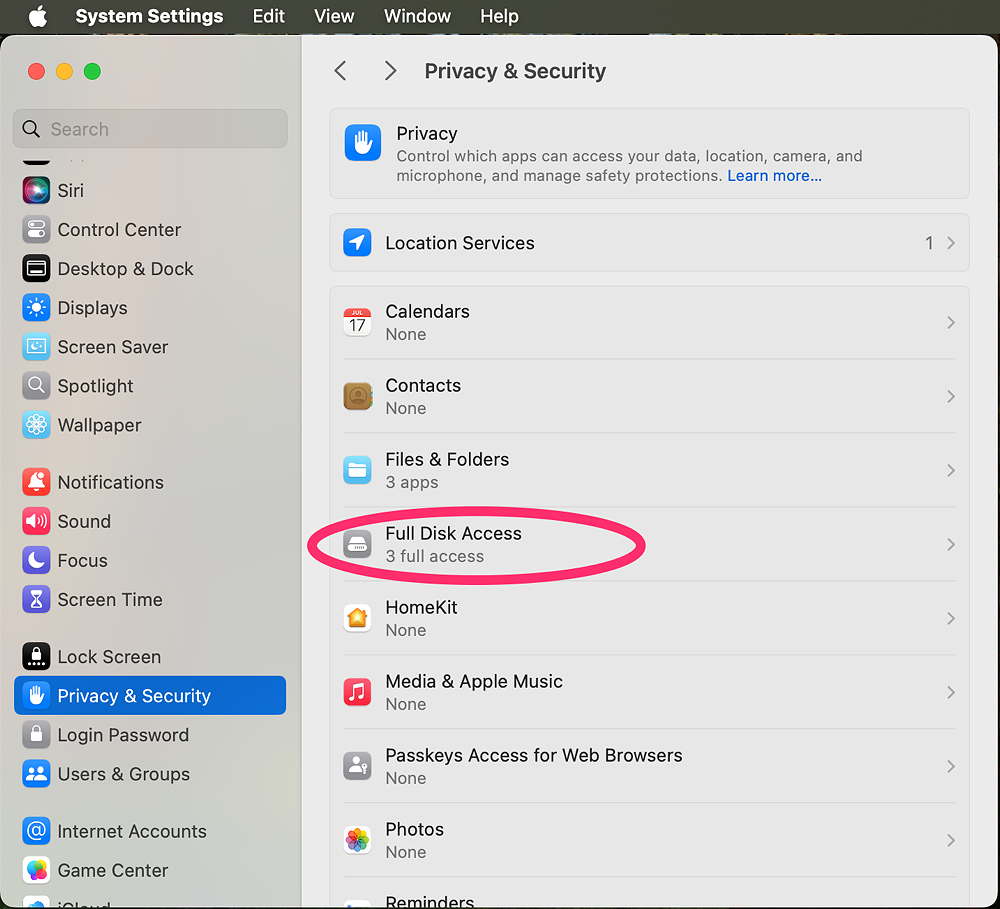
In Sequoia and Sonoma, Terminal needs to be given permission to access files.
Go to System Settings>> Privacy & Security
Select Full Disk Access>
Click on the +, navigate to Applications>Utilities and add Terminal to the list. (Your Password will be needed)—
3. Check or Create Terminal’s .bash_profile
When you launch the Terminal program, there’s a hidden file that tells it where certain other code and libraries are located on you Mac. The “path” to these code libraries are in this hidden file called the .bash_profile. The period (.) at the beginning of the name makes this file normally hidden in the Finder.
Since we’ll be installing wgrib2 with Terminal and Homebrew, the Terminal program will need to “know” the path where Homebrew placed all of its libraries and where the wgrib2 dependencies are located. The .bash_profile has this information. (This info is referred to as a system variable called $PATH.)
To view this hidden file, many people use a series of commands to navigate to the hidden directory where the .bash_profile is located and then use an archaic Terminal program called VIM to edit the file.
There’s a better way.
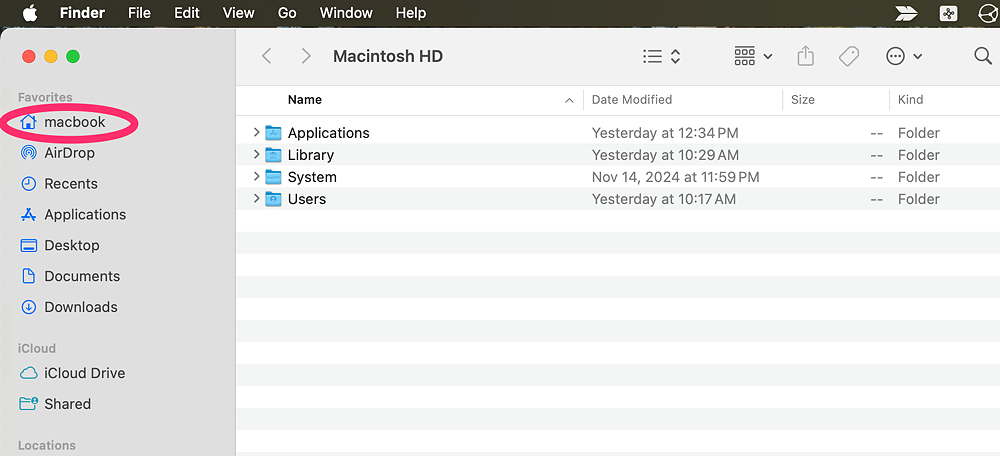
Your hidden .bash_profile is in your Home directory, the one named for your username or computer. As an example, my home directory might be called “m3imac”
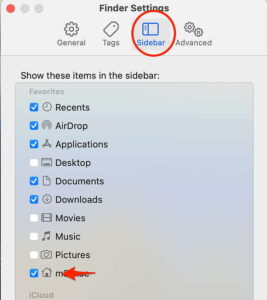
(Be certain you set to view your Home directory in the Finder Sidebar. Under Finder>Settings>Sidebar set your HOME folder to be visible in Finder Sidebar—)
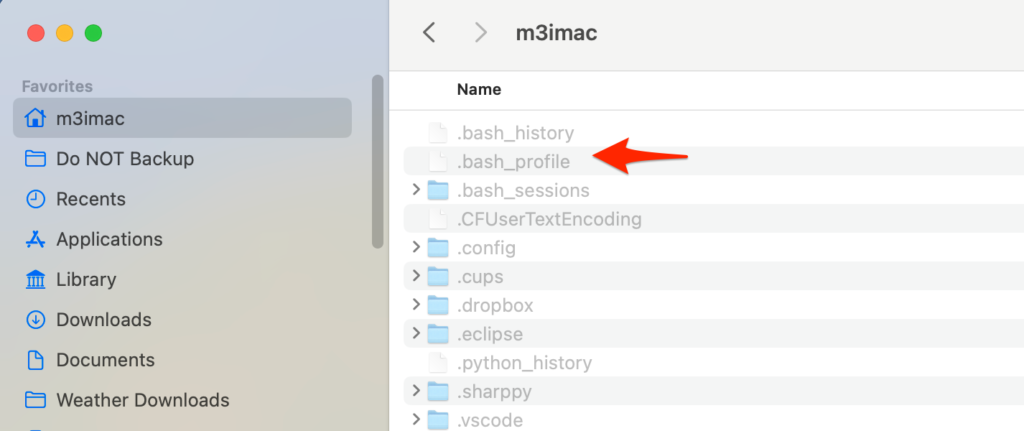
If you open that Home directory, you’ll see the usual items—
Here’s the trick to see hidden files—
–> With this Home folder open and the folder contents visible, using the keyboard, press these three keys at the same time:
COMMAND-SHIFT-PERIOD
The hidden files will become visible—
CAUTION: Making hidden files visible has dangers. Don’t accidentally delete any hidden file or rename any hidden file. Be sure to make them hidden again when done using the same Command-Shift-Period key combination.
You may not see a .bash_profile, because it may not yet exist on a pristine Sequoia installation.
–>If you don’t see a .bash_profile with your hidden files exposed, we need to create one.
To create a .bash_profile, Launch Terminal and copy and paste each of these commands, pressing return after each one—
cd ~/
touch .bash_profile
This will create a new .bash_profile. You should see it in your open Finder window.
If you DO have an existing .bash_profile, then you don’t have a pristine Sequoia install and you’ve used the bash shell at some earlier time.
If you right-click on the greyed out .bash_profile, you can select to open it with any text editor like BBedit or TextEdit and modify it, just like any other text file on your Mac. Then simply save the changes. We’ll be doing that later.
–> VERY IMPORTANT— Go back to the Finder view of your Home folder, click to make sure the Home directory window is at the front, then press COMMAND-SHIFT-PERIOD to make these files hidden again.
4. Download and Install Apple Command Line Tools
We need to install Apple Command Line Tools.
Launch Terminal (in your Applications/Utilities Folder )
Copy and paste the following command and press return.
xcode-select --install
Another dialog box will pop up. Click Install. Press OK to the license agreement.
It will take a few minutes for Command Line Tools to install. A dialog box will appear when the install is completed.
When completed, copy and paste the following command in Terminal to check to see if it’s been installed—
xcode-select -p
You should see a confirmation showing where it’s installed
/Library/Developer/CommandLineTools
I strongly recommend that you Quit Terminal after each major step and then restart the Terminal program. It avoids certain issues of being in the wrong directory, etc.
Additionally, if any command doesn’t seem to work, make sure there’s no hidden blank “space” after the pasted command.
5. Download and Install Homebrew
Homebrew is a “package installer” and is used to download and install certain dependency libraries of code, used by many utilities including wgrib2. We’ll be using Homebrew to install the dependent compiler packages called gcc (includes gfortran) and cmake.
Go to https://brew.sh/
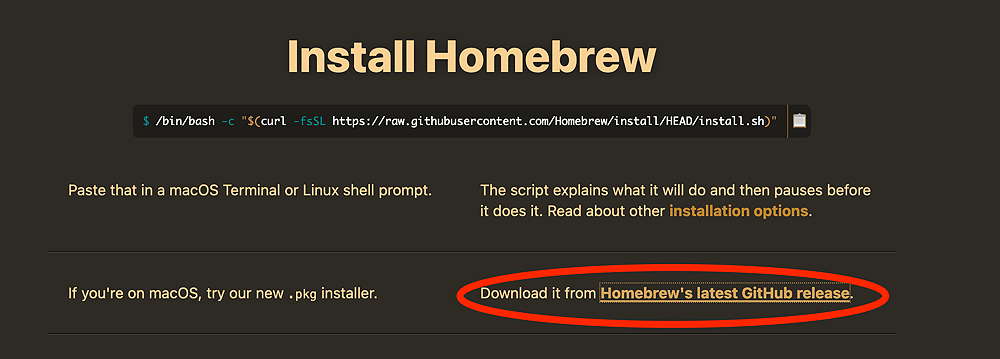
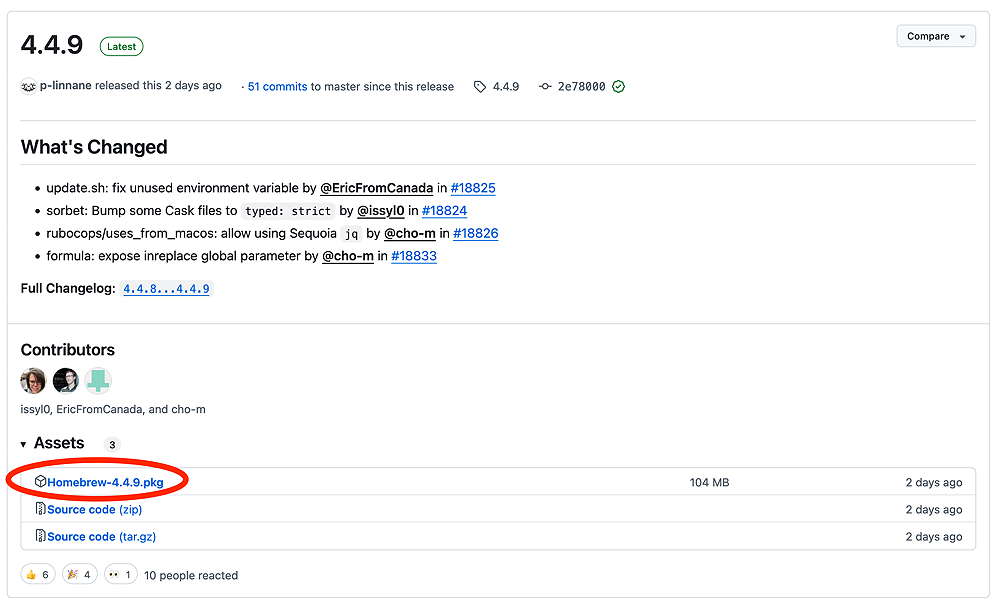
While Homebrew is often installed with a simple Terminal command copied from the main page, I recommend you download the latest version from Github here and use the installer package to install Homebrew . Run the latest version.
Homebrew’s github page—
Download the Homebrew installer package to your Downloads folder.
When the download is completed, open your Downloads folder, double-click to run it to launch. On launch, you’ll receive this message:
This package will install to the following directories:
/opt/homebrew on Apple Silicon
/usr/local/bin/brew and /usr/local/Homebrew on Intel
We’ll be needing this information later.
When the Homebrew installer is finished, the following important information is provided as next steps—
To add Homebrew to your $PATH, we will add path code to your shell profile .bash_profile
Apple Silicon
eval “$(/opt/homebrew/bin/brew shellenv)”
Intel
eval “$(/usr/local/bin/brew shellenv)”
Let’s go over how to do this —
6. Editing the bash_profile $PATH for Homebrew
As we did in step 3 above, we’re going to open the Finder window to your Home directory—
As we did before, using the keyboard, press these three keys at the same time:
COMMAND-SHIFT-PERIOD
The hidden files will display.
Double-click on the greyed .bash_profile file.
It should open in TextEdit, but you can select to open and edit it in any text editor like BBedit.
Using TextEdit, make these edits—
Apple Silicon—
If you’re on Apple Silicon, copy and paste this code into your .bash_profile file —
eval "$(/opt/homebrew/bin/brew shellenv)"
Intel —
If you’re on Intel, copy and paste this code this code into your .bash_profile file —
eval "$(/usr/local/bin/brew shellenv)"
–>Be sure to SAVE this change you just made.
Quit TextEdit after saving the change.
Click on the Finder window with the unmasked hidden files to bring it to the foreground—
Very Important: Hide the normally hidden files again. With with window active in the front, press these three keys at the same time: COMMAND-SHIFT-PERIOD
The hidden files should no longer be visible.
7. Give Homebrew Full Disk Access
As mentioned, Sequoia (and Sonoma) are more stringent about disk access permissions. Let’s rectify this restriction.
As we did in Step 2 above, (Adding Full Disk Access to Terminal), we need to give Homebrew Full Disk Access permissions.
Apple doesn’t make this easy, because the Homebrew executable is normally hidden, but here’s the solution—
Go to System Settings>> Privacy & Security
Select Full Disk Access
Full Disk Access to reveals—
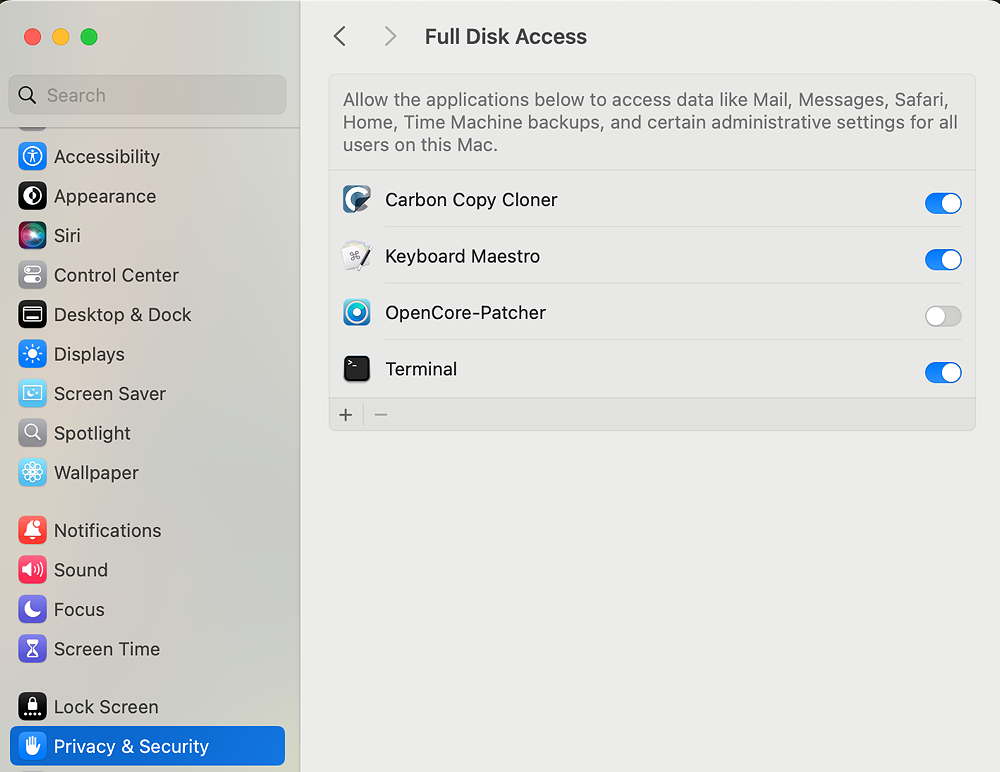
Press the +. You’ll be requested to enter your password
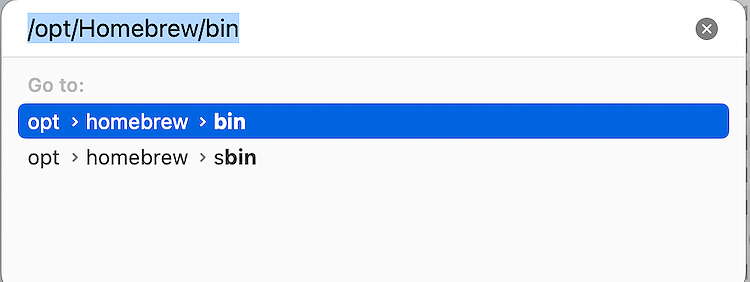
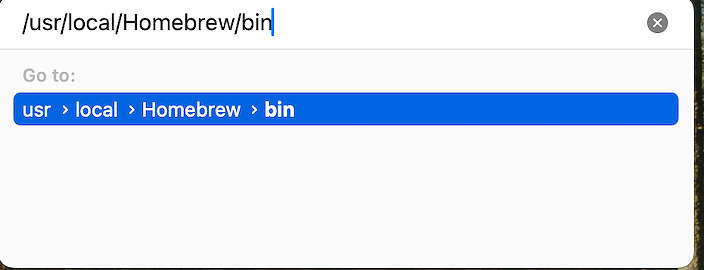
When the open dialog presents, press these three keys together—
COMMAND-SHIFT-G
Depending on your Mac (Apple Silicon or Intel), enter one of these paths
For Apple Silicon Macs—
enter /opt/Homebrew/bin and press return
/opt/Homebrew/bin
For Intel Macs—
enter /usr/local/Homebrew/bin and press return
/usr/local/Homebrew/bin
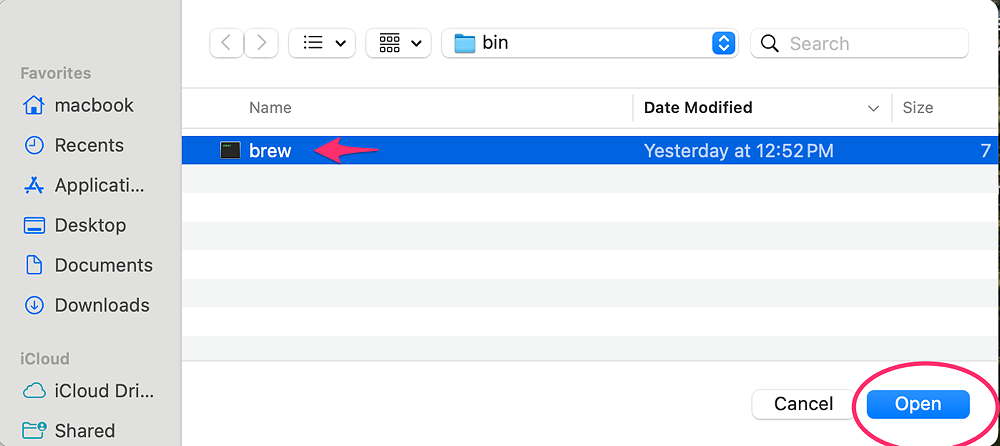
This will reveal the normally hidden Homebrew executable called “brew” in the bin directory—
Select brew in the open dialog and click Open
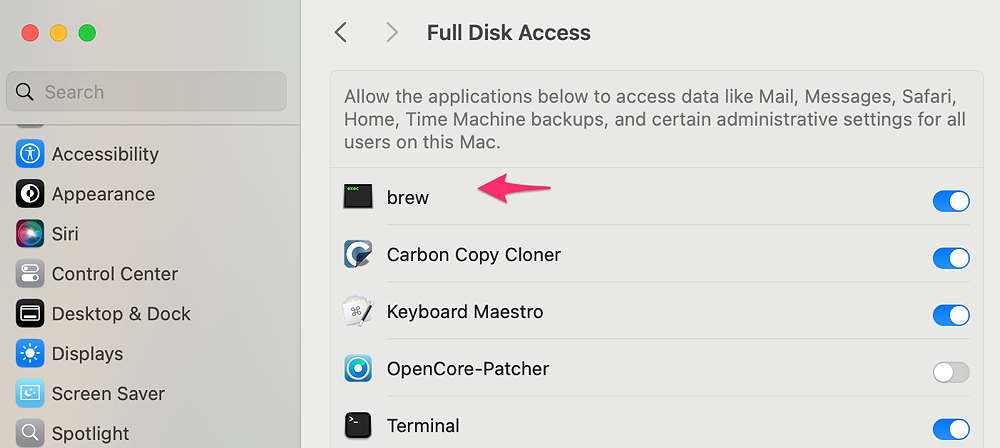
The brew executable will be added to this list.
You’ve given Homebrew the necessary permissions to run in Sequoia.
8. Using Homebrew, Install gcc (gfortran) and cmake
Now that we’ve given Homebrew permissions to access directories we’re going to use Homebrew install specific code libraries that wgrib2 compilation will need.
We’ll be installing
• gcc (gfortan, also needed, is automatically installed with gcc)
• cmake
Install gcc
First Quit Terminal , then
Re-Open Terminal
Copy and paste the command below in Terminal and press return
brew install gcc
gcc should then be installed. (Give it time. Wait until you see the command prompt to proceed.)
Check to see if/where it’s installed, copy and paste the following command in Terminal and press return—
which gcc
and terminal should show this-
/usr/bin/gcc on Intel or /opt/homebrew/bin/gcc on Apple Silicon
Installation of gcc includes automatic installation of gfortran.
To check to see if/where gfortran was installed, enter the following command in Terminal and press return—
which gfortran
and if it’s installed, Terminal will reply:
/usr/local/bin/gfortran on Intel or /opt/homebrew/bin/gfortran Apple Silicon.
Install cmake
Finally, we’ll use Homebrew to install cmake.
Open Terminal
Copy and Paste the command below in Terminal and press return—
brew install cmake
(Give it time. Wait until you see the command prompt to proceed.)
It should be installed and you can check success by using the the similar command—
which cmake
if cmake is installed, Terminal will reply:
/usr/local/bin/cmake on Intel or /opt/homebrew/bin/cmake Apple Silicon.
Quit Terminal for now.
9. Download wgrib2 from NOAA website
The latest versions of wgrib2 code from NOAA and many README documents are available from this web site:
https://www.ftp.cpc.ncep.noaa.gov/wd51we/wgrib2/
As of this writing, the latest version of wgrib2 is 3.1.3 on the NOAA site
Using your web browser, download version 3.13—
You’ll likely find the wgrib2.tgz.v3.1x package in your Downloads folder.
Move the wgrib2.tgz.v3 file from your Downloads folder to your Desktop
10. Uncompress the wgrib2.tgz download
On your Desktop, rename the wgrib2.tgz.v3.1.3 file to simply wgrib2.tgz by right clicking or option-clicking on the file and select rename. Confirm yes when it asks you to change the file type. This should be the filename
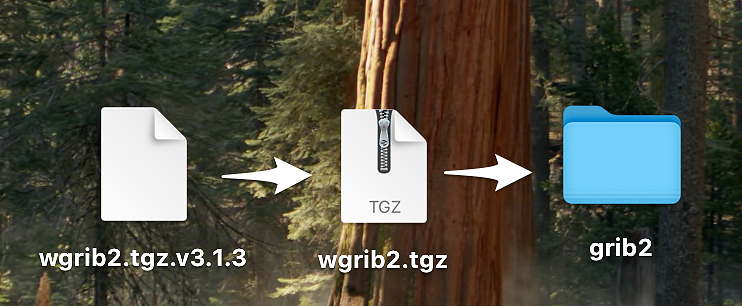
After renaming the file, double-click on the wgrib2.tgz file. The file should untar (unzip, uncompress) and a folder called grib2 will be on your Desktop.
11. Edit the compilation script called ‘makefile‘
Open the grib2 folder on your Desktop. by selecting and double-clicking its folder. Inside you’ll see a file called ‘makefile‘.
We’re going to edit this the makefile using a text editor like TextEdit or BBedit
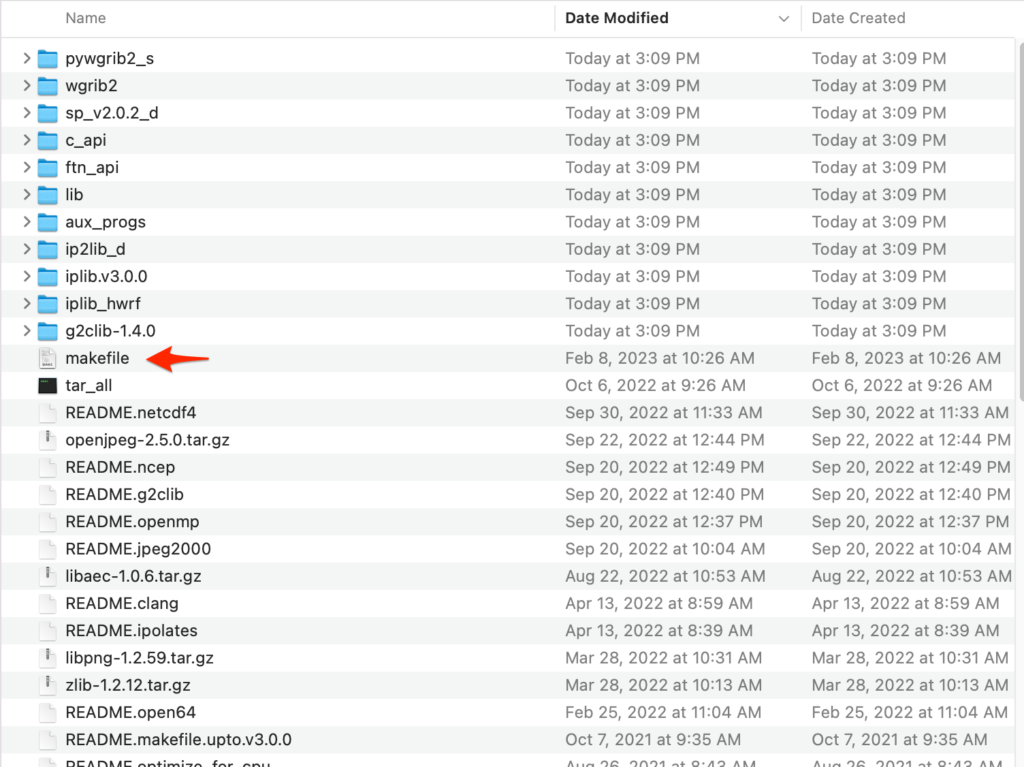
Using any text editor, open the ‘makefile‘ file. Right click on the file and select “open with”. You can use TextEdit. I’ll be using BBedit to edit the makefile —
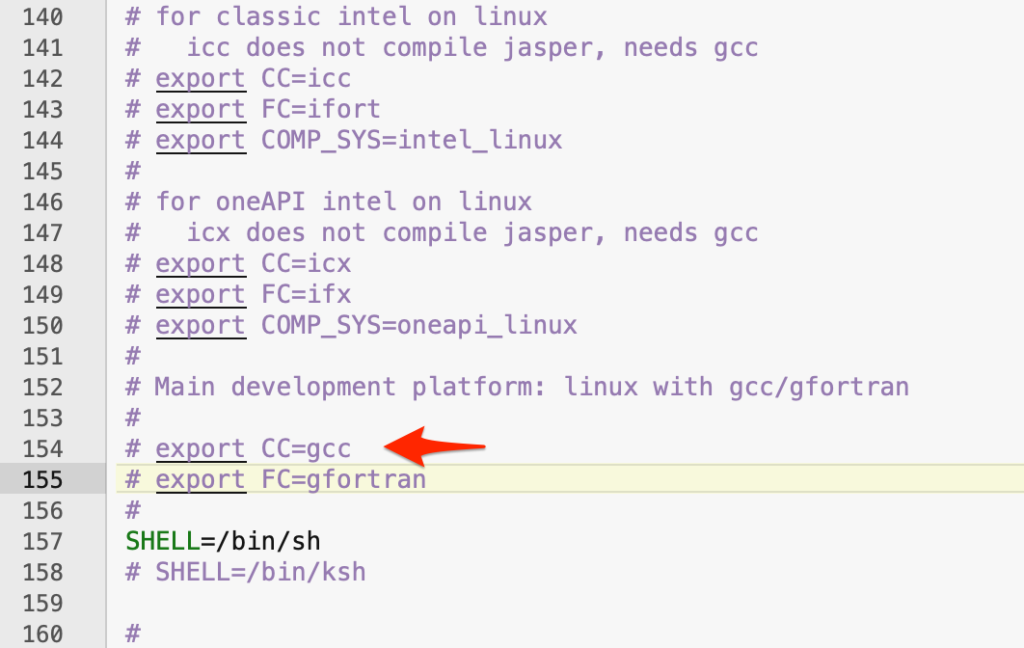
About line 154 or so (depends on the wgrib2 version) you will find under #Main development platform: linux with gcc/gfortran:
We are going to make the two lines referring to gcc and gfortran here active (by uncommenting) the lines (meaning, removing the preceding hashtag –#-).
Using your text editor, remove the # on these these two lines—
# export CC=gcc
# export FC=gfortran
change to this:
export CC=gcc
export FC=gfortran
The leading # has been removed from each line.
There are two more edits that need to be made.
Scroll down until you see the following—
Edit this line, changing the 1 to 0
USE_PROJ4=1
Change to this:
USE_PROJ4=0
And edit this PNG line changing the 1 to 0
USE_PNG=1
Change to this:
USE_PNG=0
–>SAVE all THESE CHANGES to the makefile using your text editor’s File menu Save command.
Now close the grib2 folder on your Desktop.
12. Copy and paste a copy of your modified grib2 folder
Using the Finder, select the newly modified grib2 folder on your Desktop and select the Copy command from the Edit Menu, or use the Command-c shortcut. You’re copying the grib2 folder.
Using the Go menu command from the Finder, select Go to Folder…
For Apple Silicon enter
/opt/Homebrew/
For Intel enter
/usr/local/Homebrew/
Select Paste (Command -v) from the Finder Edit menu and the wgrib2 folder that you copied from Desktop should appear in this directory—
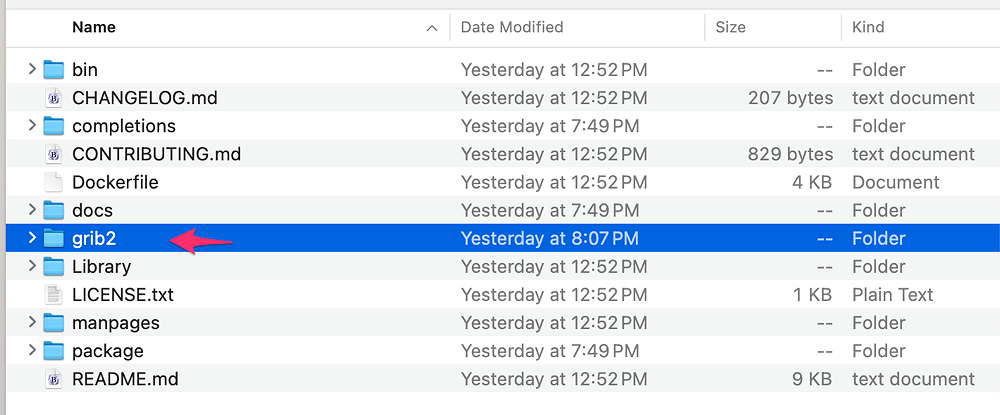
13. Duplicate and rename the gcc file.
Using the Finder Go Menu, select again Go to Folder….
for Apple Silicon
/opt/homebrew/bin/
for Intel
/usr/local/bin/
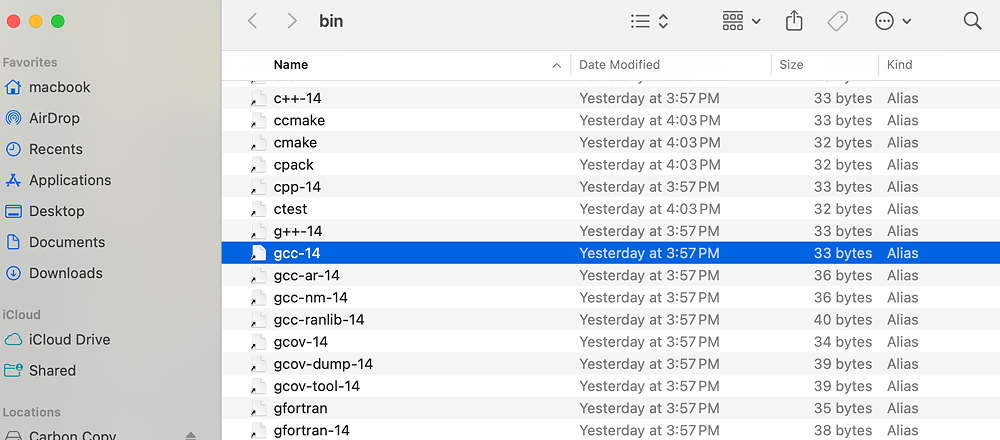
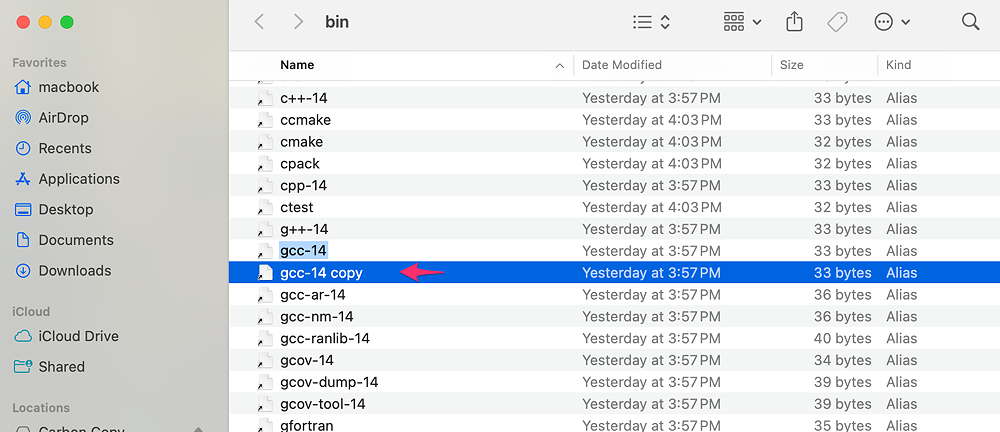
You’ll see the contents of the bin directory. Scroll down until you see gcc-14. Select this file so it’s highlighted—
With gcc-14 highlighted, select Duplicate it using the Finder’s File Menu. It will create gcc-14 copy —
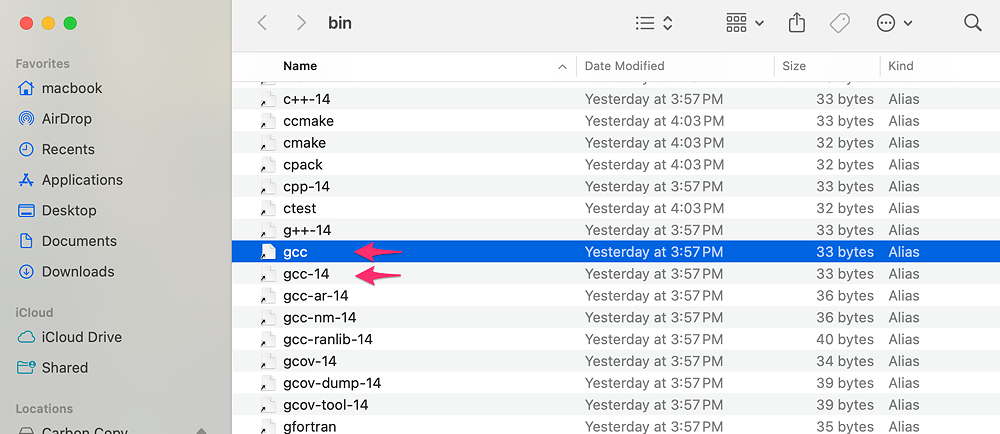
Now right click on the gcc-14 copy and rename it to just gcc —
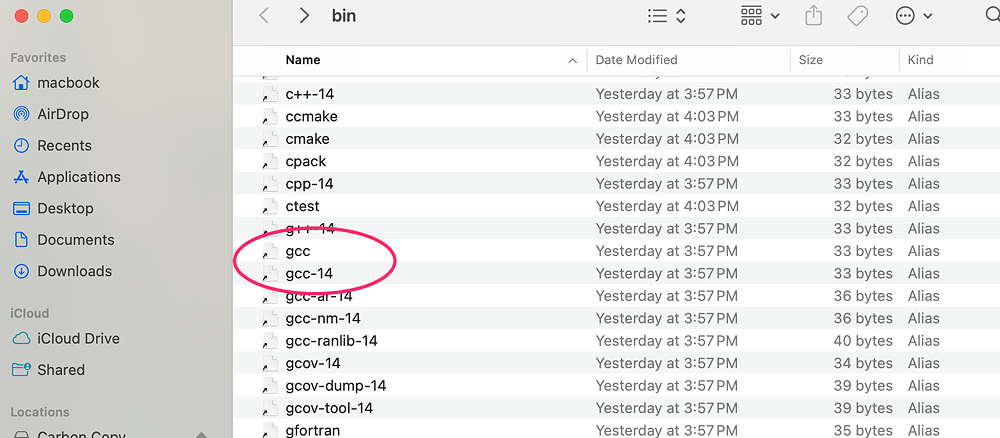
–>So after following these steps, you should have both symlinks (aliases), in the bin directory, one named gcc-14 AND the other just gcc
14. Run the ‘makefile’ compiler script in super user mode.
We’re ready to compile and install wgrib2.
Make sure you’re running as an administrator level user on your Mac.
Open Terminal.
Copy then paste the following command and press return:
For Apple Silicon, use
cd /opt/Homebrew/grib2/
For Intel, use
cd /usr/local/Homebrew/grib2/
Then enter the following command and press return:
su <yourComputerAdminName>
Substitute your username for <yourComputerAdminName>
Example macbook or glenncomp eg su glenncomp
You’ll be prompted for your user password. Enter it and press return.
sudo make
You’ll be prompted for your user password. Enter it and press return.
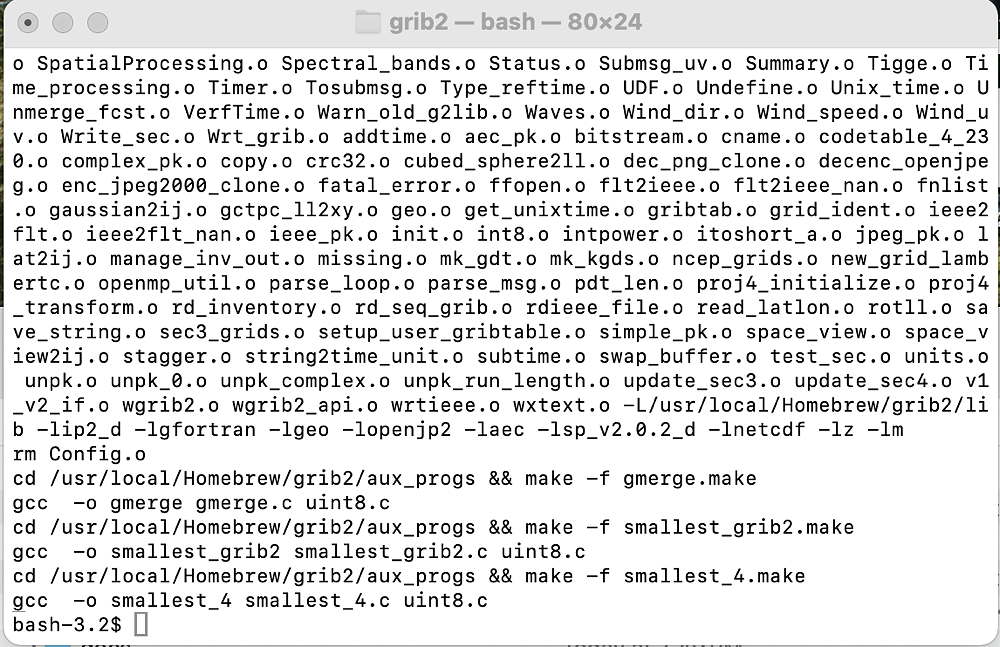
You should see a bunch of gibberish scroll past on the Terminal window as it compiles and installs. It may take as much as 8 -20 minutes for it to complete. Longer is usually a good sign.
When it completes, it should NOT have any error messages at the end. If it was successful, it won’t tell you. You just won’t see any errors at the end.
15. Create a Symlink
At this point, you must Quit Terminal. Then Restart Terminal again.
We’re going to create a symlink in your /opt/Homebrew/bin/ directory (Apple Silicon) or /usr/local/bin/ directory (Intel) so that Terminal can easily call wgrib2.
Enter the following command in Terminal and press return:
For Apple Silicon
sudo ln -s /opt/Homebrew/grib2/wgrib2/wgrib2 /opt/Homebrew/bin
For Intel
ln -s /usr/local/Homebrew/grib2/wgrib2/wgrib2 /usr/local/bin/
Enter your user password when prompted. Press return. A symlink will have been created allowing you to directly access wgrib2 from Terminal.
Now, let’s check if wgrib2 has been installed with the symlink working—
At this point, you must Quit Terminal. Then Restart Terminal again.
In Terminal, enter the following command in Terminal and press return—
which wgrib2
You should see the response
/opt/homebrew/bin/wgrib2
To see what wgrib2 can do, just enter this in Terminal and press return:
wgrib2
You should see all the commands wgrib2 can accept scroll in the Terminal window.
To see wgrib2 in action, use the terminal command on any .grib2 file you have to see its message contents—
wgrib2 -s mygribfile.grib2
Use the tips found here to use wgrib2— https://www.ftp.cpc.ncep.noaa.gov/wd51we/wgrib2/tricks.cheap

see the "tricks" links at

https://www.ftp.cpc.ncep.noaa.gov/wd51we/wgrib2/
Need Help with an Installation?
Use this Feedback form to email me.
Include your email address and the following information:
• Are you using Intel or Apple Silicon (M1 etc) ?
• What Mac system version are you using?
• Is this a new, clean install machine or was it migrated from another Mac?
• Had you previously installed Homebrew or other conda/miniconda?
• Which directory is Homebrew installed in ? /usr/local or /opt
• Is there an existing /usr/local/ directory?
• Did you make all the changes needed in the makefile compiler script —
Change- USE_PROJ4=1 to USE_PROJ4=0
Change- USE_PNG=1 to USE_PNG=0
Here’s a helpful article here about HomeBrew and Apple Silicon.
Here’s a helpful article about removing Homebrew to start clean.
#wgrib2 #install wgrib2 on MacOS

