
#wgrib2 #version_3.6 #Installation #MaOS #Sequoia #Sonoma
03-07-2025 New wgib2 Install Guide for Advanced Mac Users is here.
03-20-25: wgrib2 version 3.7 is in final stages for release. wgrib2 v 3.7 fixes issues, including proper handling of rotated files such as the HRDPS. I recommend waiting for 3.7 to be released.
03-07-25- I’ve updated the installation directories and improved the reliability of the install. At this point, there appears to be an issue with rotating Canadian HRDPS files. NOAA is investigating whether it’s an issue with wgrib2-3.6 or the NCEPLIBS-ip library 5.2.0
03-07-2025– changed install location ; added additional build command and pointers to dependencies add. I’ve changed the directory to be /opt/homebrew/opt from simply /opt/homebrew. This works. (Otherwise you end up with redundant directories in /opt/homebrew and /opt/homebrew/opt
03-02-2025– changed install location for easier install
Posted February 2025 for new wgrib2 v 3.6
wgrib2 development has moved to GitHub. Wesley Ebisuzaki, the principal NOAA scientist who led the initial development of this utility through version 3.1.3 has posted some information about this new open source version. Let me summarize—
The main differences are — it is compiled with cmake, not with a makefile and several dependent libraries are no longer included with the wgrib2 download; they must be downloaded and compiled separately and then linked. All software is now on GitHub, as are the dependent libraries. Documentation is also being moved to GitHub.
As of this writing, I am still using the older version (3.1.3) of wgrib2, first released in 2022, on two of my four Macs.
The new version 3.6 is actually less difficult to install than earlier versions (v3.1.3 and earlier). By installing the new version, you will familiarize yourself with the new process to install future upgrades.
Apple Silicon Only
I am limiting this tutorial to Apple Silicon Macs. Since the package manager, Homebrew, will be used to install dependent libraries, we will be installing in this normally hidden directory on your Mac —
/opt/homebrew/opt
Location on older Intel Macs: /usr/local/homebrew
For those older Intel Macs, these instructions likely will work if you
change /opt/homebrew/opt to /usr/local/homebrew
in the all instructions and commands given below.
Some Background on the wgrib2 utility
To work efficiently with very large weather GRIB2 data files, the wgrib2 utility was developed by a team of several NOAA data scientists, led by Wesley Ebisuzaki. It is an essential command line based C and fortran program used to index and manipulate weather data grib2 files.
Most commonly, it’s used to extract and manipulate specific weather model parameters, perform calculations, and to create GRIB2 files that cover smaller geographic areas.
wgrib2 is a low level command line application that runs on the Mac’s original underlying Unix-Darwin foundation. The Terminal program (command line) is used to run wgrib2.
Successful installation is dependent on your Mac’s specific directory structure and the versions and locations of code libraries (“dependencies”) installed on your specific Mac. As a result, you must compile the wgrib2 program based on these dependencies and the specific directory structure of your Mac.
wgrib2 3.6 is supplied as as folder of code and code libraries on GitHub that are downloaded in compressed form (.tgz). Compile scripts are run to put the program together.
Most of this tutorial is geared towards novices with little/no experience in using Terminal commands. More experienced users, please don’t be put off by the hand-holding.
Overview of the wgrib2 3.6 Installation Steps for MacOS
- Change the default Terminal shell to bash shell
- Give Terminal Full Disk Access in Privacy Settings
- Check the hidden .bash_profile file or create if it is missing
- Download and Install Apple Command Line Tools
- Download Homebrew package installer needed to install required library “dependencies”.
- Create Homebrew recommended links and $PATH changes in .bash_profile
- Give Homebrew Full Disk Permissions
- Using Homebrew, install various library dependencies – gcc, gfortran, cmake and others. Confirm proper directory structure and PATHs using ‘brew doctor‘ command.
- Download NCEPLIBS-wgrib2, NCEPLIBS-ip and NCEPLIBS-g2c from the GitHub rename each file to be named as above.
- Uncompress (‘untar’) all 3 of the above compressed directories/folders and Rename all three downloaded folders
- Edit the CMAKEFILE.txt in each of the three above directories.
- Copy and paste the edited copies of NCEPLIBS-wgrib2, NCEPLIBS-ip and NCEPLIBS-g2c into /opt/homebrew
- Run the CMAKE commands provided for each of those directories using Terminal commands to build and compile. The NCEPLIBS-wgrib is done LAST.
- Create a symlink of the installed wgrib2, adding it to so that it can easily be called using Terminal.
- Create a $PATH in .bash_profile so that wgrib2 can find the other two library directories.
Let’s Get Started
Make sure you are have administrator privileges on your Mac. Your probably do if you’re the only user of your machine.
1. Change Default Shell to bash
The Terminal program (Applications>>Utilities>>Terminal) on Sequoia uses something called zsh as the default shell language.
For this installation, we are going to switch back to the older shell language called bash.
Use your Terminal application to switch its shell default.
Open Terminal. Copy, then paste this command at the Terminal prompt:
chsh -s /bin/bash
Then Press return. It will request your password. Press return again.
You MUST Quit Terminal to have the change activated.
If you re-open Terminal, your bash command prompts should now begin with $ (bash) instead of % (zsh)
2. Change Terminal Disk Access Permissions
In Sequoia and Sonoma, Terminal needs to be given permission to access files. (According to Apple, Apple installed programs don’t need this, but that’s not been my experience.)
Go to System Settings>> Privacy & Security
Select Full Disk Access>
Click on the +, navigate to Applications>Utilities and add Terminal to the list. (Your Password will be needed)—

3. Check or Create Terminal’s .bash_profile
When you launch the Terminal program, there’s a hidden file that tells it where certain other code and libraries are located on you Mac. The “paths” (referred to as the variable $PATH) to these code libraries are contained in this hidden file called the .bash_profile. The period (.) at the beginning of the name makes this file normally hidden in the Finder.
Since we’ll be installing wgrib2 with Terminal and Homebrew, the Terminal program will need to “know” the path where Homebrew placed all of its libraries and where the wgrib2 dependencies are located. The .bash_profile has this information.
To see if you have a .bash_profile, open Terminal and enter the following commands, then press Return—
cd ~/
ls -a
You should see Terminal show all the files in the main directory ~/.
Look for .bash_profile—
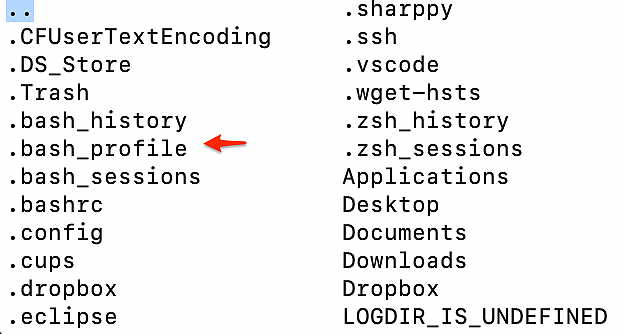
If you see a .bash_profile, you’re good to go to the next step
If you don’t see .bash_profile, you need to create one. With the Terminal window still open, Enter the following command in Terminal.
cd ~/
touch .bash_profile
That should do it!
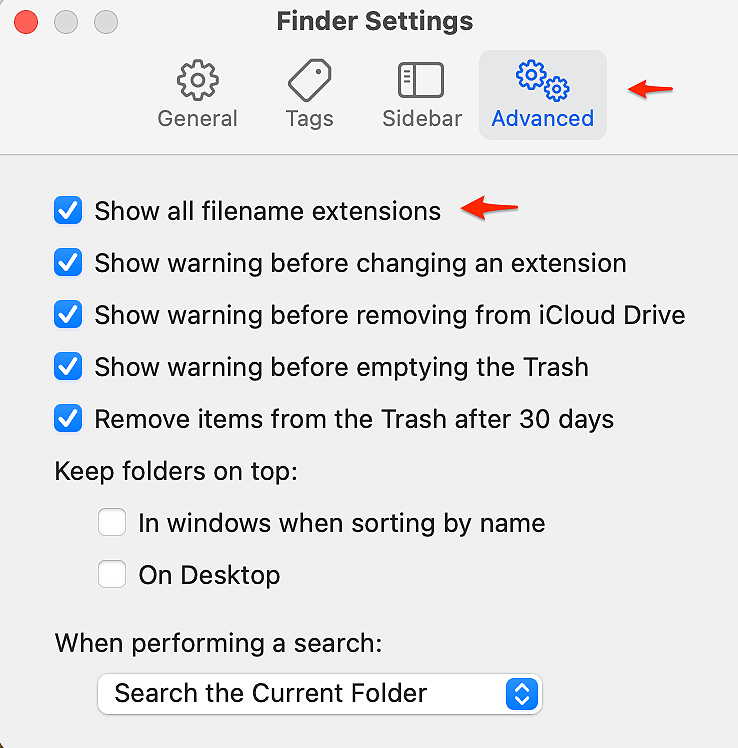
3a. Allow Finder Path Bar to be Visible
While we’re in the Finder, with any Finder window open, Select Finder>>View>> Show Path Bar—

This comes in handy. It will show you the directory path you’re in at the bottom of the Finder windows. Clicking on the small icons can move you up a level or two. This is especially useful when navigating hidden folders as we will be doing later.

One more thing. To make life easier, while we’re changing Finder Settings, make sure you selected “Show all filename extensions” in Finder Advanced Settings—
4. Download and Install Apple Command Line Tools
We need to install Apple Command Line Tools.
Launch Terminal (in your Applications/Utilities Folder )
Copy and paste the following command, then press Return—
xcode-select --install
Another dialog box will pop up. Click Install. Press OK to the license agreement.
It will take a few minutes to install Command Line Tools A dialog box will appear when the install is completed.
When completed, copy and paste the following command in Terminal to check to see if it’s been installed—
xcode-select -p
You should see a confirmation showing where it’s installed
/Library/Developer/CommandLineTools
Additionally, if any command doesn’t seem to work, make sure there’s no hidden blank “space” following the pasted command.
5. Download and Install Homebrew
Homebrew is a “package installer” and is used to download and install certain dependency libraries of code, used by many utilities including wgrib2. We’ll be using Homebrew to install the dependent compiler packages called gcc (includes gfortran) and cmake, along with some others.
To install Homebrew, go to https://brew.sh/
While Homebrew is often installed with a simple Terminal command copied from the main page, I recommend you download the latest version from Github here and use the installer package to install Homebrew . Run the latest version.
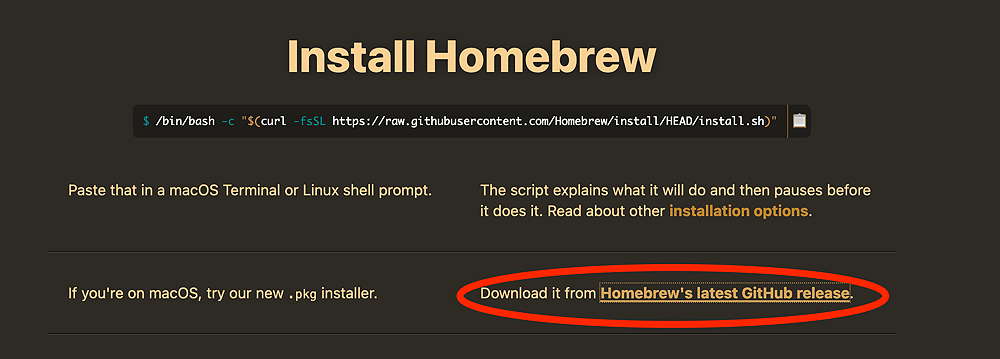
Homebrew’s github page—
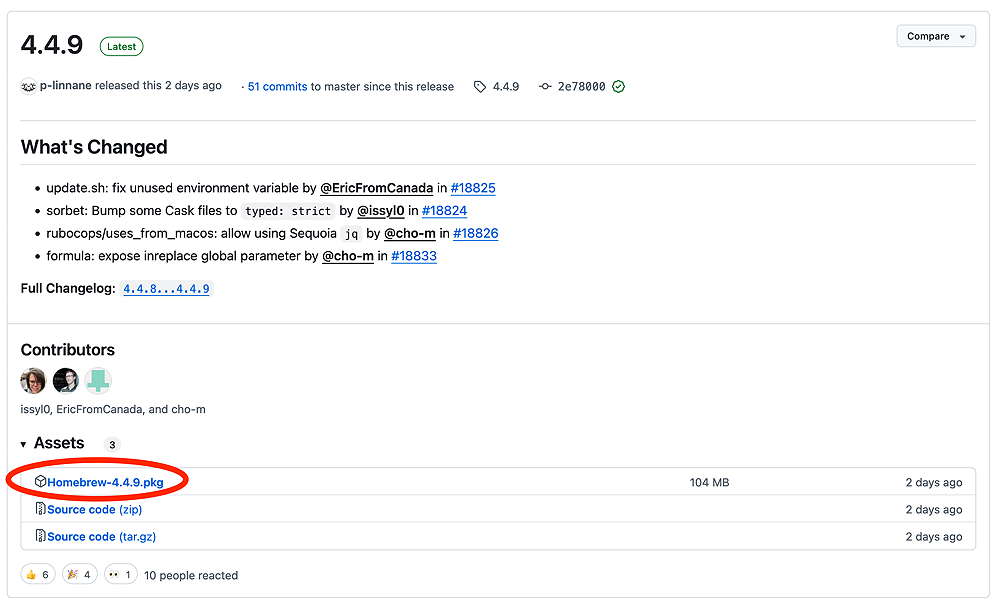
Download the Homebrew installer package to your Downloads folder.
When the download is completed, open your Downloads folder, double-click to launch it. On launch, you’ll receive this message:
This package will install to the following directories:
/opt/homebrew on a clean new Apple Silicon machine.
On Apple Silicon Machines migrated from a previous Intel computer backup, it might still be using the /usr/local/ directory. In this case, Homebrew will be installed at /usr/local/Homebrew on Intel.
When the Homebrew installer is finished, pay attention to the message displayed—
“To add Homebrew to your $PATH, add this path code to your shell profile .bash_profile”
• Clean Install on Apple Silicon M1 and greater:
eval “$(/opt/homebrew/bin/brew shellenv)”
• Macs with systems migrated from a previous Intel Mac.
eval “$(/usr/local/bin/brew shellenv)”
The next section explains how to add Homebrew to your $PATH variable.
6. Add Homebrew $PATH to your .bash_profile
Here’s how we add Homebrew to your $PATH variable.
Open Terminal,, then copy the entire command below, then press Return—
echo 'eval "$(/opt/homebrew/bin/brew shellenv)"' >> ~/.bash_profile
source ~/.bash_profile
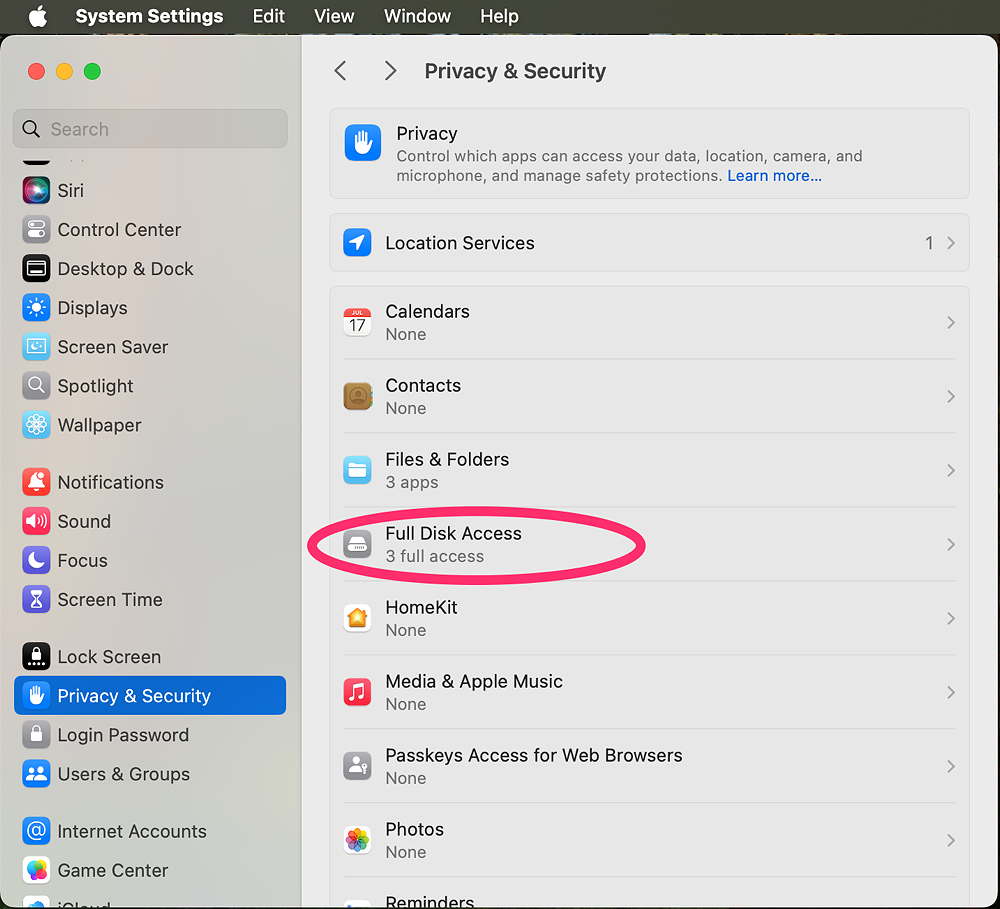
7. Give Homebrew Full Disk Access
As mentioned, Sequoia (and Sonoma) are more stringent about disk access permissions for security reasons. We need to give Homebrew permissions to folders. (It’s not clear whether this needs to be done, but I’ve had installation issues when permissions weren’t granted to Homebrew.) Let’s rectify this restriction.
As we did in Step 2 above, (Adding Full Disk Access to Terminal), we need to give Homebrew Full Disk Access permissions.
Apple doesn’t make this easy, because the Homebrew executable (called “brew“) is normally hidden, but here’s the solution—
Go to System Settings>> Privacy & Security
Select Full Disk Access
Full Disk Access to reveals current applications with full access—
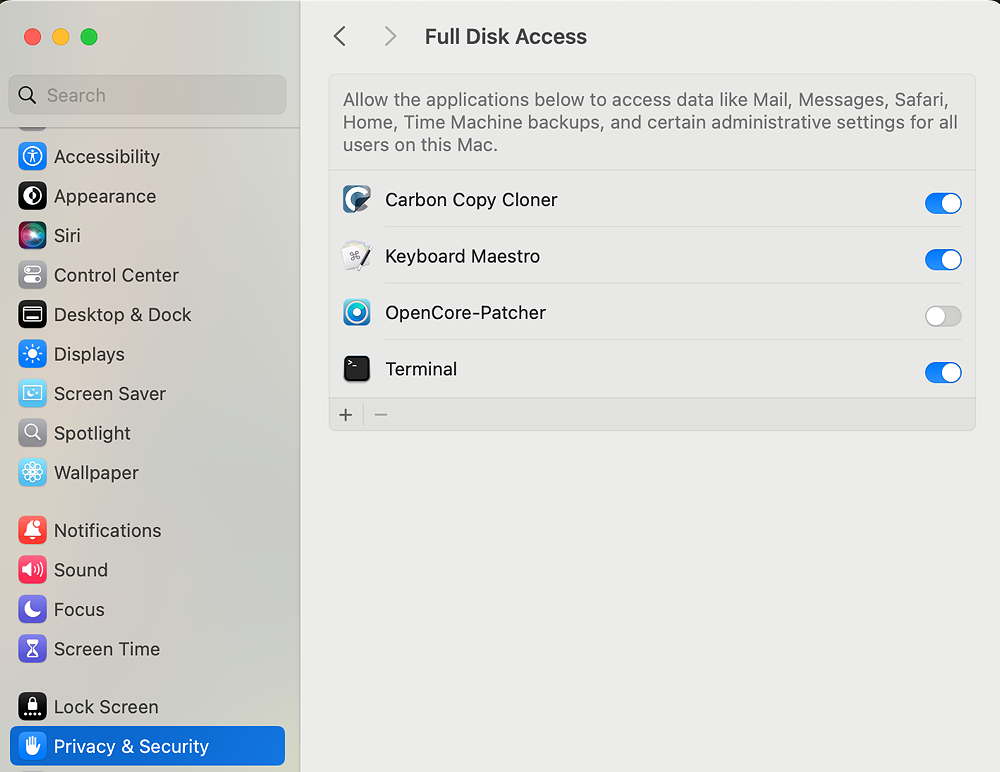
Press the +. You’ll be requested to enter your password.

When the open dialog presents, press these three keys together—
COMMAND-SHIFT-G
For Apple Silicon Macs—
enter /opt/homebrew/bin and press return
/opt/homebrew/bin
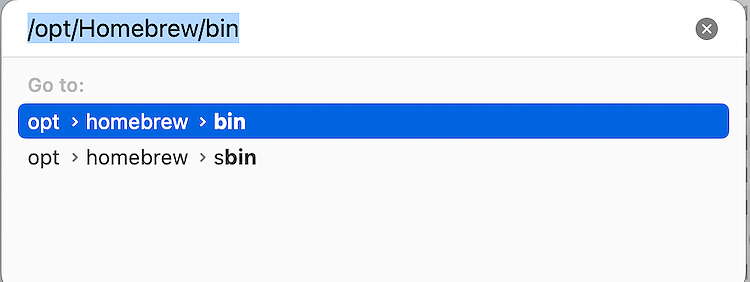
This will reveal the normally hidden Homebrew executable called “brew” in the bin directory (/opt/homebrew/bin) —
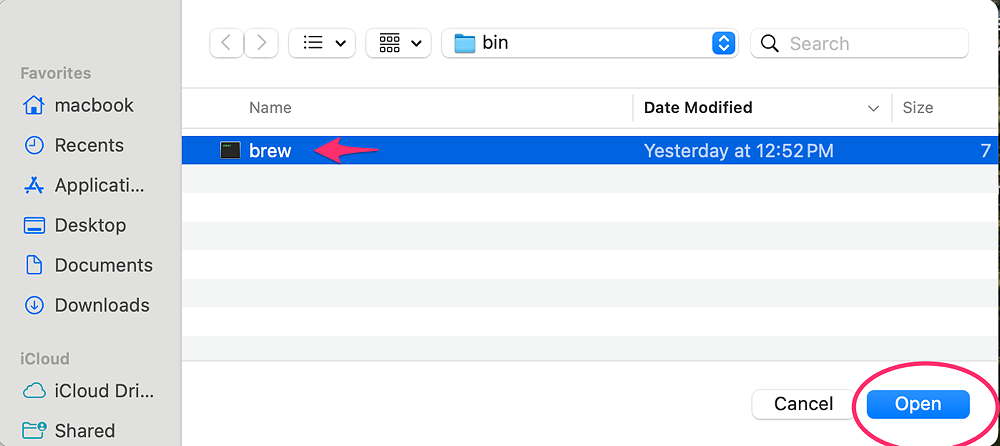
Select brew in the open dialog and click Open
The brew executable will be added to this list.
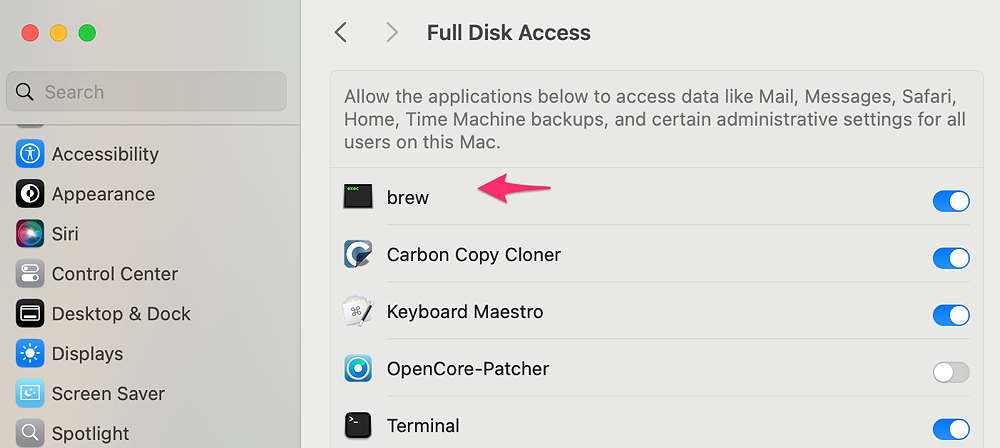
You’ve given Homebrew the necessary permissions to run in Sequoia and Sonoma.
8. Using Homebrew, Install library dependencies
Now that we’ve given Homebrew permissions to access directories we’re going to use Homebrew to install specific code libraries that wgrib2 and its associated libraries compilations will need.
We’ll be installing
• gcc (gfortan, also needed, is automatically installed with gcc)
• cmake
• openblas
• lapack
• jasper
• libaec
We will be installing libraries that read JPEG 2000 and Type 40 compression, the most common for NOAA, ECMWF, Canadian and German DWD weather grib2 files. We will not be enabling .PNG support.
Installing these libraries of code with Homebrew is pretty simple and the commands are all similar. Let’s start with gcc
Install gcc
First Quit Terminal , then Re-Open Terminal
Copy and paste the command below in Terminal and press return
brew install gcc
gcc should then be installed. (Give it time. Wait until you see the command prompt again to know its completed. )
Check to see if/where it’s installed, copy and paste the following command in Terminal and press return—
which gcc
and terminal should show this-
/opt/homebrew/bin/gcc on Apple Silicon
Installation of gcc includes automatic installation of gfortran.
Repeat the same sequence with the remaining Homebrew library code installs—
Install cmake
brew install cmake
Install openblas
brew install openblas
Install lapack
brew install lapack
Install jasper
brew install jasper
Install libaec
brew install libaec
You can check that each are installed with the same “which” command. When all six libraries have been installed, you can Quit Terminal.
Quit Terminal for now.
9. Download NCEPLIBS-wgrib2, NCEPLIBS-ip and NCEPLIBS-g2c from GitHub
(Older versions of wgrib2 (3.1.3 and earlier) and original documentation of wgrib2 are found here: https://www.ftp.cpc.ncep.noaa.gov/wd51we/wgrib2/)
We will be installing the new version 3.6 We need to download three (3) install packages from GitHub.
NCEPLIBS-wgrib2 https://github.com/NOAA-EMC/wgrib2
NCEPLIBS-ip https://github.com/NOAA-EMC/NCEPLIBS-ip
NCEPLIBS-g2c https://github.com/NOAA-EMC/NCEPLIBS-g2c
In each case, we’ll want the source code (tar.gz) package.
Instead of manually downloading from each web page, GitHub provides an easier way of downloading these three packages.
Using Terminal, copy, paste, and press RETURN with each of the following 3 commands:
cd ~/Downloads

git clone https://github.com/NOAA-EMC/NCEPLIBS-wgrib2.git
Wait for the download to finish, then copy and paste this command:
git clone https://github.com/NOAA-EMC/NCEPLIBS-ip.git
Wait for the download to finish, then copy and paste this command:
git clone https://github.com/NOAA-EMC/NCEPLIBS-g2c.git
10. Decompress all three tar.gz packages
If you downloaded from the web site, these packages download as .tgz files. If you used the git command above, the packages auto-decompress into folders. You don’t need to decompress manually and the folders are properly named .
We’ve selected the downloads to occur in your ~/Downloads folder.
In the Finder, in your Downloads folder, double-click on each of the three tar.gz packages and they automatically decompress into folders.
Here’s my Download Folder with the three tar.gz files and the three decompressed folders after double-clicking on each —
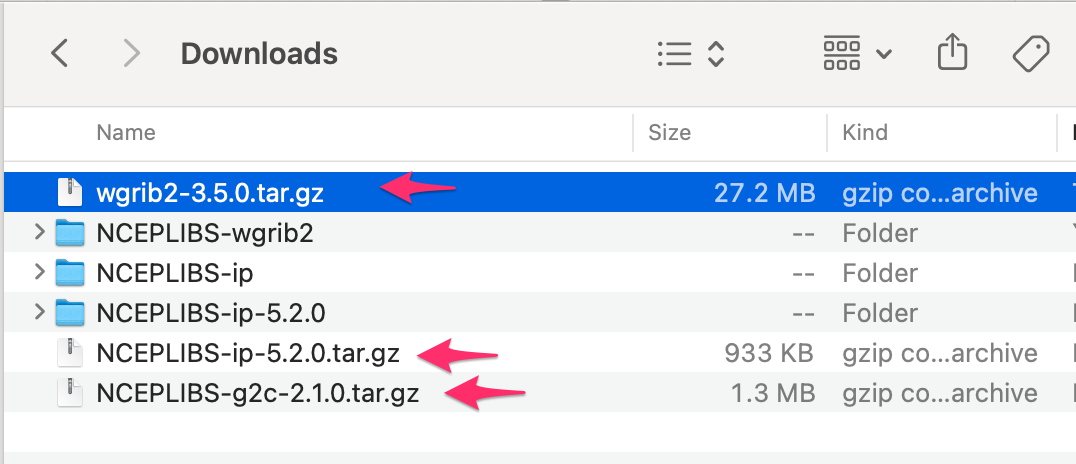
IMPORTANT: After you have decompressed each file, you must rename each folder exactly as shown below by right-clicking on each and select Rename—
• The wgrib2-3.6.0 folder must be renamed to NCEPLIBS-wgrib2
• The NCEPLIBS-ip-5.20 folder must be renamed to NCEPLIBS-ip
• The NCEPLIBS-g2c-2.1.0 folder must be renamed to NCEPLIBS-g2c
11. Edit the Compilation file instructions: CMakeLists.txt
We’re still working in your Downloads Folder with each of the three folders you have just renamed— NCEPLIBS-wgrib2 NCEPLIBS-ip NCEPLIBS-g2c
Inside each of those three folders is a text file called CMakeLists.txt
Using any text editor, we will open and edit the ‘ CMakeLists.txt‘ files in two of the three folders.
We’re going to change the order that we’re looking at these three folders— First NCEPLIBS-ip, then NCEPLIBS-g2c and finally NCEPLIBS-wgrib2
11a. No changes are needed in the NCEPLIBS-ip CMakeLists.txt file.
11b. Open the NCEPLIBS-g2c folder. You’ll see the CMakeLists.txt—
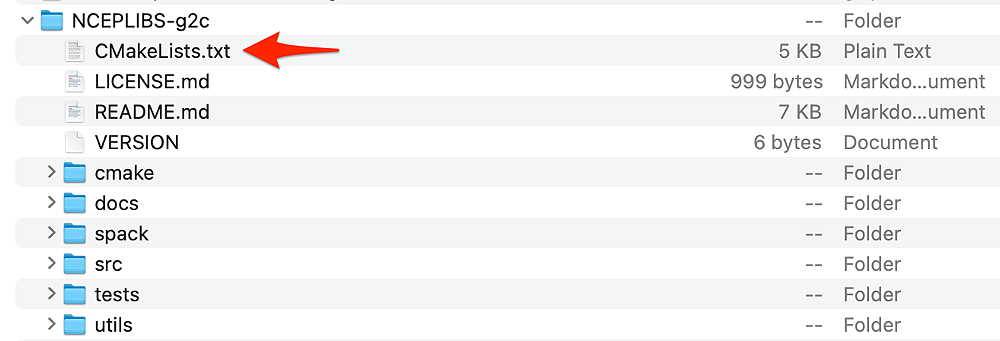
NCEPLIBS-g2c folder- Open the CMakeLists.txt n TextEdit or BBedit This is what it looks like before we edit it. The red arrow lines must be changed from what is shown below—
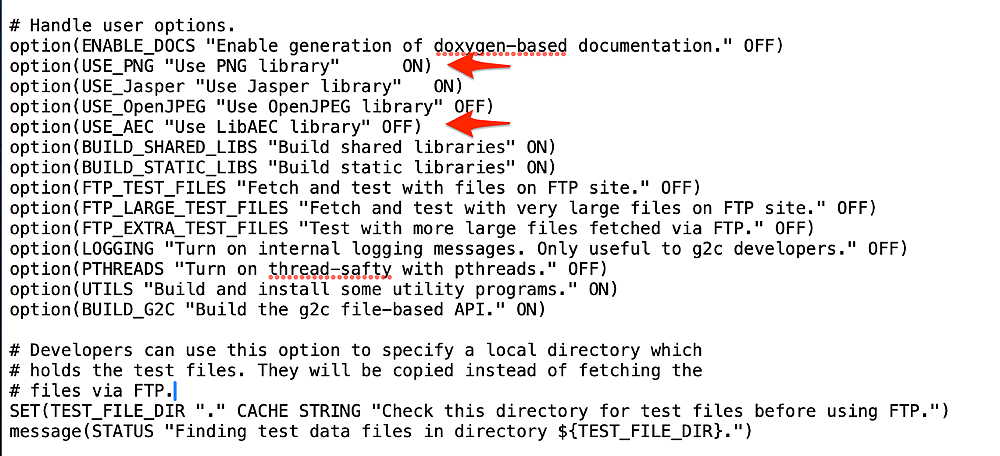
1. Make the following edits of this NCEPLIBS-g2c CMakeLists.txt—
option(USE_PNG “Use PNG library” ON) Change to OFF
option(USE_AEC “Use LibAEC library” OFF) Change to ON
–>After making the changes, SAVE and close this .txt file.
Next, let’s go to the NCEPLIBS-wgrib2 folder
2. Make the following edits of this NCEPLIBS-wgrib2 CMakeLists.txt—
Now go to the NCEPLIBS-wgrib2 folder and open the folder and make these edits of its CMakeLists.txt file. This is what it looks like before it’s edited—
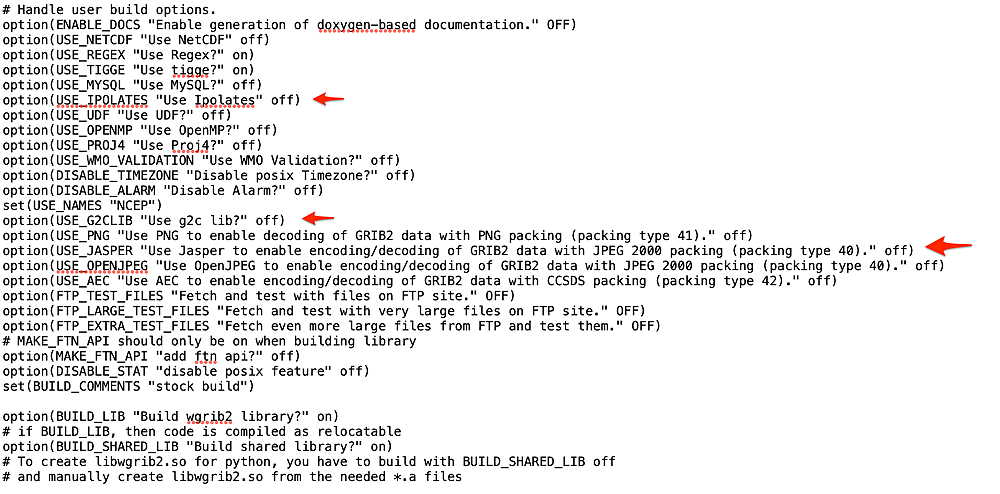
Make the following edits of this NCEPLIBS-wgrib2 CMakeLists.txt—
option(USE_IPOLATES “Use Ipolates” off) Change to ON
option(USE_G2CLIB “Use g2c lib?” off) Change to ON
option(USE_JASPER “Use Jasper to…type 40).” off) Change to ON
option(USE_AEC “Use AEC to enable…) Change to ON
–>After making the changes, SAVE and close this .txt file.
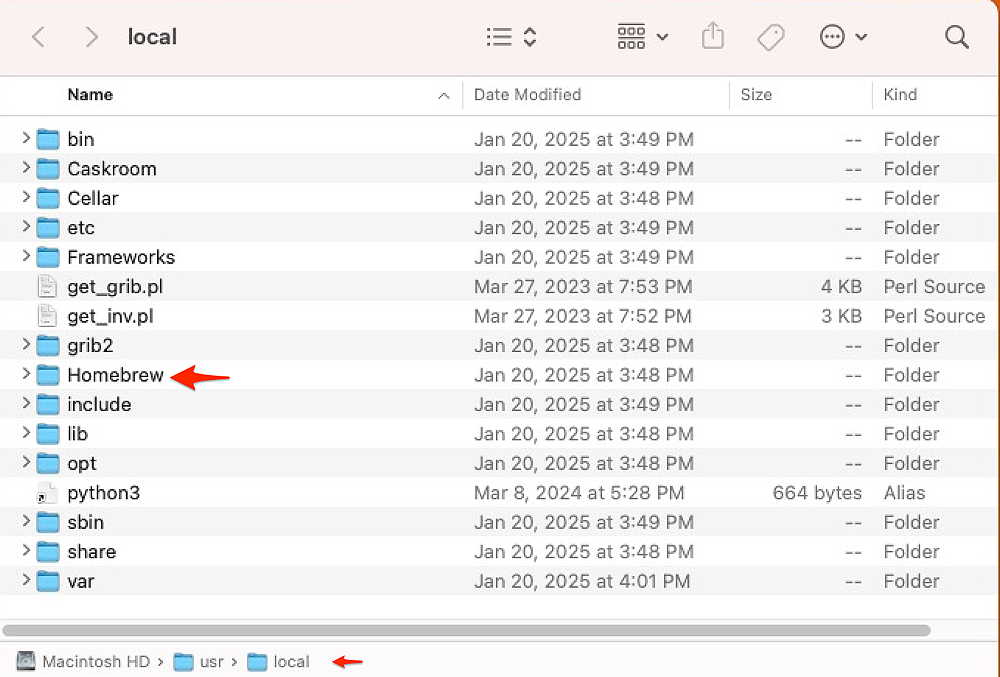
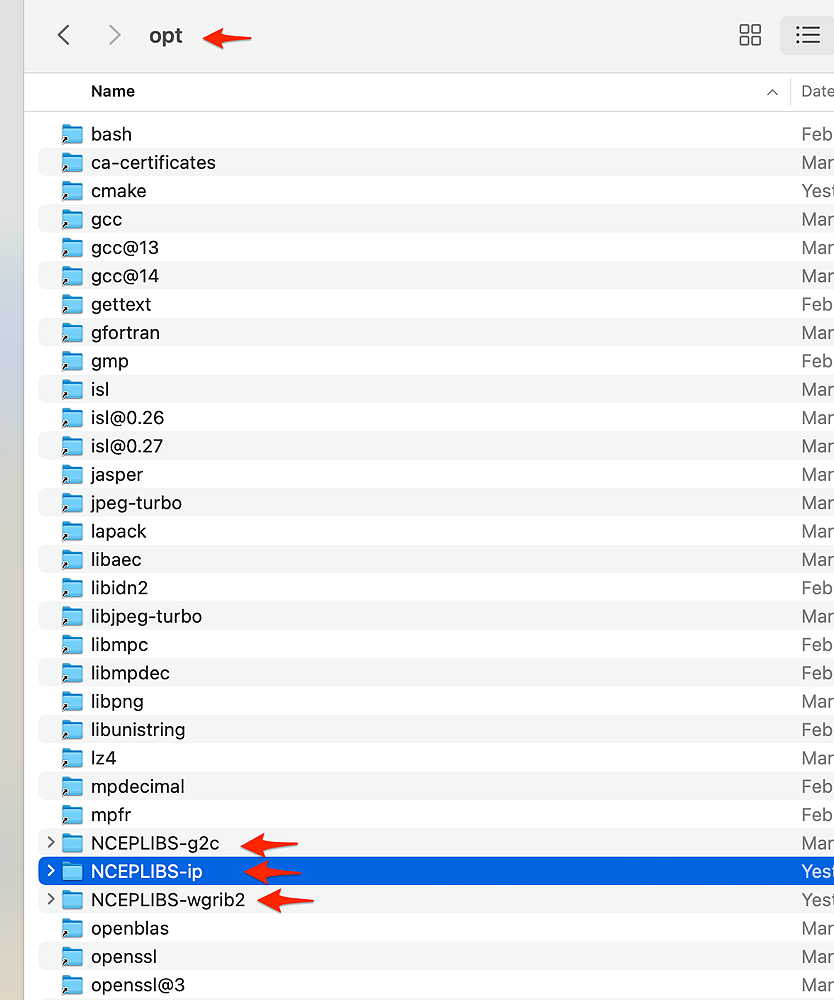
12. Copy and paste your modified NCEPLIBS-wgrib2, NCEPLIBS-ip, NCEPLIBS-g2c folders into the Homebrew Directory—
Sill in the Downloads Folder of the Finder, select all three of the newly modified NCEPLIBS-wgrib2 NCEPLIBS-ip NCEPLIBS-g2c folder select the Copy command (select all 3 while holding the Command Key) from the Edit Menu, or use the Command-c shortcut. You’re copying all three folders.
Using the Go menu command from the Finder, select Go to Folder… or use the keys COMMAND-SHIFT-G
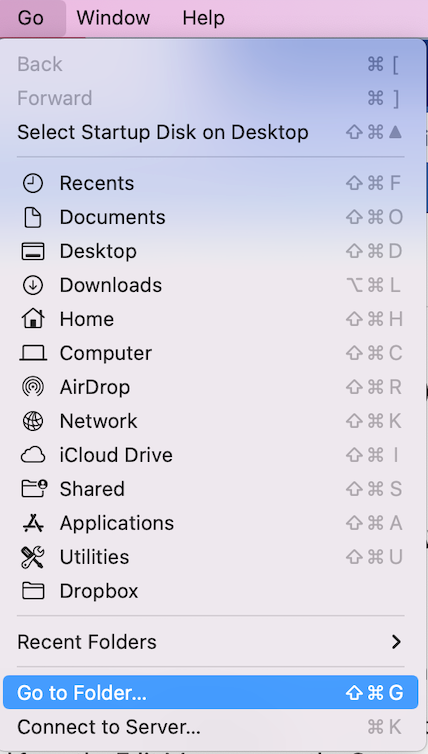
Enter
/opt/homebrew/optWhen the /opt/homebrew/opt/ directory opens, Select Paste (Command -v) from the Finder Edit menu and all three folders you copied from Downloads should now appear in the /usr/local/opt directory
13. Run the CMAKE Build Install and Compile commands
a. Start with NCEPLIB-ip
Open Terminal
Unlike other instructions, Copy ONE command line at a time below and PASTE into Terminal then press RETURN. Let it run before copying and pasting the next command line. The first ‘sudo’ command will request your password. Wait for each command to complete—
cd /opt/homebrew/opt/NCEPLIBS-ip

sudo mkdir build && cd build


sudo cmake .. -DCMAKE_INSTALL_PREFIX=/opt/homebrew/opt/NCEPLIBS-ip/build/install \
              -DCMAKE_OSX_DEPLOYMENT_TARGET=15.0 \
              -DCMAKE_OSX_ARCHITECTURES=arm64 \
              -DBUILD_SHARED_LIBS=ON \
              -DBLAS_LIBRARIES=/opt/homebrew/opt/openblas/lib/libblas.dylib \
              -DLAPACK_LIBRARIES=/opt/homebrew/opt/lapack/lib/liblapack.dylib


sudo make -j$(sysctl -n hw.logicalcpu)

sudo make install
There should be no errors at the end.
b. Next, Install NCEPLIB-g2c
Copy ONE command line at a time below and PASTE into Terminal then press RETURN. The first ‘sudo’ command will request your password. Wait for each command to complete before proceeding with the next command line.
cd /opt/homebrew/opt/NCEPLIBS-g2c

sudo mkdir build && cd build

export JASPER_INCLUDE_DIR=/opt/homebrew/opt/include/jasper
export JASPER_LIBRARIES=/opt/homebrew/opt/lib/libjasper.dylib
export JPEG_INCLUDE_DIR=/opt/homebrew/opt/include
export JPEG_LIBRARY=/opt/homebrew/opt/lib/libjpeg.dylib


sudo cmake .. -DCMAKE_INSTALL_PREFIX=/opt/homebrew/opt/NCEPLIBS-g2c \
              -DCMAKE_OSX_DEPLOYMENT_TARGET=15.0 \
              -DCMAKE_OSX_ARCHITECTURES=arm64 \

sudo make -j$(sysctl -n hw.logicalcpu)

sudo make install
There should be no errors at the end.
c. Finally, Install NCEPLIB-wgrib2
Copy ONE command LINE AT A TIME below and PASTE into Terminal then press RETURN. The first ‘sudo’ command will request your password. Wait for each command to complete.
cd /opt/homebrew/opt/NCEPLIBS-wgrib2

sudo mkdir build && cd build

sudo cmake .. \
    -DCMAKE_INSTALL_PREFIX=/opt/homebrew/opt/NCEPLIBS-wgrib2 \
    -DCMAKE_PREFIX_PATH="/opt/homebrew/opt/NCEPLIBS-ip/build/install/lib;/opt/homebrew/opt/NCEPLIBS-ip/build/install/include_4;/opt/homebrew/opt/NCEPLIBS-ip/lib/cmake/ip;/opt/homebrew/opt/NCEPLIBS-g2c" \
    -DCMAKE_C_COMPILER=/usr/bin/clang \
    -DCMAKE_CXX_COMPILER=/usr/bin/clang++ \
    -DCMAKE_EXE_LINKER_FLAGS="-L/opt/homebrew/opt/NCEPLIBS-ip/lib -lip_4" \
    -DUSE_IPOLATES=ON \
    -DUSE_G2CLIB=ON \
    -DUSE_AEC=ON


sudo make -j$(sysctl -n hw.logicalcpu)

sudo make install
There should be no errors at the end.
14. Create a $PATH addition and Symlink
At this point, Quit Terminal. Then Restart Terminal again.
First we’ll create a symlink in /opt/homewbrew/bin so Terminal can invoke wgrib2—
Enter this in Terminal and press return—
ln -s /opt/homebrew/opt/NCEPLIBS-wgrib2/bin/wgrib2 /opt/homebrew/bin
So that wgrib2 can find dependent libraries, we’re going to use a command to edit your .bash_profile $PATH variable.
Using Terminal Enter these as single separate commands—
export DYLD_LIBRARY_PATH="/opt/homebrew/opt/NCEPLIBS-wgrib2/lib:$DYLD_LIBRARY_PATH"
echo 'export DYLD_LIBRARY_PATH="/opt/homebrew/opt/NCEPLIBS-wgrib2/lib:$DYLD_LIBRARY_PATH"' >> ~/.bash_profile
source ~/.bash_profile
export DYLD_LIBRARY_PATH="/opt/homebrew/opt/NCEPLIBS-ip/build/install/include_4:$DYLD_LIBRARY_PATH"
echo 'export DYLD_LIBRARY_PATH="/opt/homebrew/opt/NCEPLIBS-ip/build/install/include_4:$DYLD_LIBRARY_PATH"' >> ~/.bash_profile
source ~/.bash_profile
export DYLD_LIBRARY_PATH="/opt/homebrew/opt/NCEPLIBS-g2c/lib:$DYLD_LIBRARY_PATH"
echo 'export DYLD_LIBRARY_PATH="/opt/homebrew/opt/NCEPLIBS-g2c/lib:$DYLD_LIBRARY_PATH"' >> ~/.bash_profile
source ~/.bash_profile
export DYLD_LIBRARY_PATH="/opt/homebrew/opt/NCEPLIBS-ip/lib:$DYLD_LIBRARY_PATH"
echo 'export DYLD_LIBRARY_PATH="/opt/homebrew/opt/NCEPLIBS-ip/lib:$DYLD_LIBRARY_PATH"' >> ~/.bash_profile
source ~/.bash_profile
15. Test if wgrib2 has been installed
Now, let’s check if wgrib2 has been installed with the symlink working—
Quit Terminal. Then Restart Terminal again.
In Terminal, enter the following command and press return—
which wgrib2
You should see the response
/opt/homebrew/bin/wgrib2
(If you don’t see this response, you’ll need to create a symlink to the wgrib2 executable. Latest testing shows it’s not required.)
To see what wgrib2 can do, just enter this command in Terminal and press return:
wgrib2
You should see all the commands wgrib2 can accept scroll in the Terminal window.
To see wgrib2 in action, use the terminal command on any .grib2 file you have to see its message contents—
wgrib2 -s mygribfile.grib2
Use the tips found here to use wgrib2— https://www.ftp.cpc.ncep.noaa.gov/wd51we/wgrib2/tricks.cheap

see the "tricks" links at

https://www.ftp.cpc.ncep.noaa.gov/wd51we/wgrib2/
Need Help with an Installation?
Use this Feedback form to email me.
Include your email address and the following information:
• Are you using Intel or Apple Silicon (M1, etc) ? These instructions are for Apple Silicon.
• What Mac System Version are you using? (Sonoma Sequoia Other)
• Have you previously installed conda or miniconda?
• Have you previously installed Homebrew?
• Is this a new, clean install machine or were your computer files migrated from a previous Intel Mac in the past?
• Have you previously installed Homebrew?
• Which directory is Homebrew installed in ? /usr/local or /opt
Here’s a helpful article here about HomeBrew and Apple Silicon.
Here’s a helpful article about removing Homebrew to start clean.
#wgrib2 #install _wgrib2 _on_MacOS