
Links to all four versions of my install tutorials are here. (This is the original install tutorial for old Macs.)
Older computers and Mac OSX systems may still require the instructions on this page.
These instructions work on El Capitan, High Sierra, Mojave, Catalina and Big Sur, Monterey, Ventura. (Intel Macs) However, each version of MacOS will require a compatible install of gcc/gfortran using Homebrew and Xcode Command Line Tools.
For M1 Macs, I have be successful by making a copy of Terminal and using it in Rosetta mode. I hope to have more info on this at a future time.
Revisions and Updates
03-15-23 Installed latest version of wgrib2 (wgrib2.tgz.v3.1.2) on Ventura (Intel Mac) Added additional step to install cmake using HomeBrew.
10-04-22 I’ve updated some instructions for wgrib2 3.1.1. and gcc-12 gfortran-12. Updates are highlighted.
02-10-22 Updated to work with Monterey 12.2 Changes are highlighted below. Also works on Big Sur. Have not tested on Apple Silicon M1 or M2
12-24-21: Wesley Ebisuzaki of NOAA has updated his README file at his WGRIB2 PAGE with valuable hints and info
09-27-21: I can confirm that the information below works for wgrib2 v 3.02 on Mac OS X Monterey and Big Sur (Intel). I have not had the opportunity to try to install on an M1 Mac, but it looks like HomeBrew has an updated version of gcc that works on an M1.
12-05-20: As of September 2020, the wgrib2 utility has been updated to version 3.0.0. I have tested and installed the the new wgrib2 3.0.0 and the instructions below still work.
12-27-19: wgrib2 v 2.9
All files can be found at https://www.ftp.cpc.ncep.noaa.gov/wd51we/wgrib2/
Introduction to wgrib2 – About wgrib2
To work efficiently with very large weather GRIB2 data files, the wgrib2 utility was developed by several NOAA data scientists, especially Wesley Ebisuzaki. It is an essential command line-based C and fortran-based program used to view and manipulate weather data grib2 files. Most commonly, it’s used to extract specific weather parameters and to create grib2 files that cover small geographic areas.
While there are several quick online guides for compiling and installing on Linux and Windows machines, I found that the online instructions for installing and compiling wgrib2 on Mac OS X were good, but not good enough for me to be successful.
Here’s the main pages with multiple links from NOAA about wgrib2—
https://www.cpc.ncep.noaa.gov/products/wesley/wgrib2/
Here is where you download the latest version of the wgrib2 file—
https://www.ftp.cpc.ncep.noaa.gov/wd51we/wgrib2/
It has all the links on the subject, including installation instructions (but not enough detail for a Mac install.)
Since wgrib2 is dependent upon your Mac’s directory structure and other specific software dependencies, it must be compiled on and for your specific Mac. I’ve had little success in transferring the compiled program between Macs.
Over many months and prior to posting these instructions, I ran into compilation errors repeatedly when. I could find little help online and only a very limited number of online articles specific to Mac installation. I was just about ready to give up when I finally figured out ‘the tricks’ needed for it to compile on Mac OS X 10.14.6. These are included in the instructional that follows. I’m posting this instructional so that others will not be daunted by the process of installing wgrib2 on their Mac.
Installing Instructions Part I:
There are two main online instruction sources for compiling and installing wgrib2 on Mac OS X and I am extremely grateful to the authors for their posts:
How to install wgrib2 in OSX
https://rda.ucar.edu/datasets/ds083.2/software/wgrib2_install+.txt
https://www.cpc.ncep.noaa.gov/products/wesley/wgrib2/compile_questions.html
Individually these three links provided the essential flow of installation and compilation of wgrib2 sequence on the Mac.
However, their instructions only got me part way there. I still had compilation errors.
Much of what I’m going to review is from the first link above (“How to install wgrib2 on OSX “Bovine Aerospace”) but there will be important changes that I found essential for the install to work. In this instructional, I will use mostly Mac-like approaches. Terminal commands like chmod, etc won’t be used.
Here goes:
First, make sure you’re running as an Administrator on your Mac. While many of the downloads don’t require it, you won’t be able to run essential Terminal commands without Administrator and “super user” permissions. You can check if you’re an administrator by going to System Preferences>> Users & Groups on your Mac and make sure you’re running as an Administrator.
Now, let’s download the wgrib code:
The latest versions of wgrib2 code from NOAA and README documents are available from this web site:
https://www.ftp.cpc.ncep.noaa.gov/wd51we/wgrib2/
You can also use ftp to download the latest version:
ftp://ftp.cpc.ncep.noaa.gov/wd51we/wgrib2/wgrib2.tgz
You’ll likely find the wgrib2.tgz.v3.1x package in your Downloads folder.
Note: The files are posted like this: wgrib2.tgz.v3.1.1. After you download the file, rename it from wgrib2.tgz.3.1.1 to just wgrib2.tgz Otherwise it won’t be recognized as a file that can be opened.
Xcode Command Line Tools, HomeBrew, gcc, gfortran and cmake need to be installed before installing wgrib2.
Install xCode Command Line Tools
Install the “Xcode Command Line Tools” using Terminal:
Launch Terminal.
enter the following command and press return
xcode-select --installVerify that you’ve successfully installed Xcode Command Line Tools using Terminal by entering this command and press return
$ xcode-select -p
You should see a confirmation showing where it’s installed
iMac$ xcode-select -p /Applications/Xcode.app/Contents/Developer
Check if gcc is installed—
Next, check if gcc ( a C compiler) has been installed on your Mac in the past—
To do so, enter this command in Terminal and press return:
which gcc
If it’s installed, it will respond with the directory it’s in:
/usr/local/bin/gcc
If it doesn’t show /usr/local/bin/gcc , it’s not installed. We’ll use HomeBrew package installer to install gcc.
Install HomeBrew, then install gcc, gfotran, cmake,
gcc can be installed with a “package installer” called HomeBrew. HomeBrew will also be used to install other dependencies, so now’s the time to download and install HomeBrew.
Go to https://brew.sh/ and follow the relatively simple instructions to install HomeBrew by pasting a command from it’s website home page into your Terminal program.
Copy the command from the HomeBrew page.
Then, paste it into Terminal. HomeBrew will install.
After you’ve installed HomeBrew, restart your machine.
Go back into Terminal and issue the following command to install gcc:
brew install gcc
gcc should then be installed.
Check to see where it’s installed, Enter the following command
which gcc
and terminal should show this, if gcc is installed:
/usr/local/bin/gcc
When using HomeBrew to install gcc, another necessary compiler, gfortran will be installed along with it as well.
Let’s check to see if, gfortran, was installed by entering this in Terminal and pressing return.
which gfortran
and if it’s installed, Terminal will reply:
/usr/local/bin/gfortran
Check the versions in your directory
One more thing. Let’s check the exact name of the installed versions in your /usr/local/bin directory:
Using the Finder, select the GO menu
Select Go to Folder….
Enter the path to your bin folder:
/usr/local/bin
You should see the alias versions of gcc and gfortran that were installed in the local bin directory: In my installation it was gcc-9 and gfortran-9. (update: latest version is gcc-12)
Update 02-10-2022 . When updating to gcc-12 using Monterey and homebrew, I needed to have both the “gcc-12” alias and “gcc” aliases in the bin folder for it to compile without errors.
After installing or upgrading to gcc-12 using Homebrew, go to the Finder> Go menu >Go to Folder…..
enter /usr/local/bin
Select gcc-12 in the bin folder and duplicate it using the Finder’s Edit menu. Then rename the alias to “gcc”. Both aliases need to be in the bin folder.
Do the same with gfortran-12.
Here’s what the bin folder should look like after with BOTH aliases in the bin folder- As you can see with the previous picture, both aliases (actually ‘symlinks’ ) need to be in the “bin” folder. (update: this graphic shows gcc-11. Current version should show gcc-12. So you should have the following aliases: gcc-12 and gcc gfortran-12 and gfortran in this bin folder)
Use Terminal commands to determine the version # that’s installed on your computer:
In Terminal, type:
gcc --version
In Terminal, type:
gfortran --version
This turned out to be important. Later on, we’ll be modifying the ‘make’ file script for installation of wgrib2. We will need to enter the exact version # ( for example, “gcc-12”, “gfortran-12”) when we edit the ‘make’ file script as described later.
Install “cmake” using Hombrew
Update 2023 for the latest wgrib2 and Ventura An additional install is required with the latest wgrib2 and MacOS. You will need to install cmake.
Install “cmake” using HomeBrew.
Using Terminal enter:
brew install cmake
We’ve completed the first part of the process.
The wgrib2.tgz Package
Next, we’re going to deal with the wgrib2.tgz package that was downloaded earlier and is likely in your Downloads folder.
Make a copy of the wgrib2.tgz package and move it to your desktop.
(We’re going to do the work initially on the Desktop, although advanced users might want to put it directly in /usr/local/, but let’s keep it simple.
Open the Terminal program. At the prompt, type these two commands
cd ~/Desktop
tar -xzvf wgrib2.tgz
This will “untar” (“unzip” if you’re used to Windows and Mac) the install package.
When untarred, you should see a new folder named grib2 on your Desktop.
In the Finder, open the grib2 folder: Inside, you will see all the libraries and scripts needed to compile and install wgrib2.
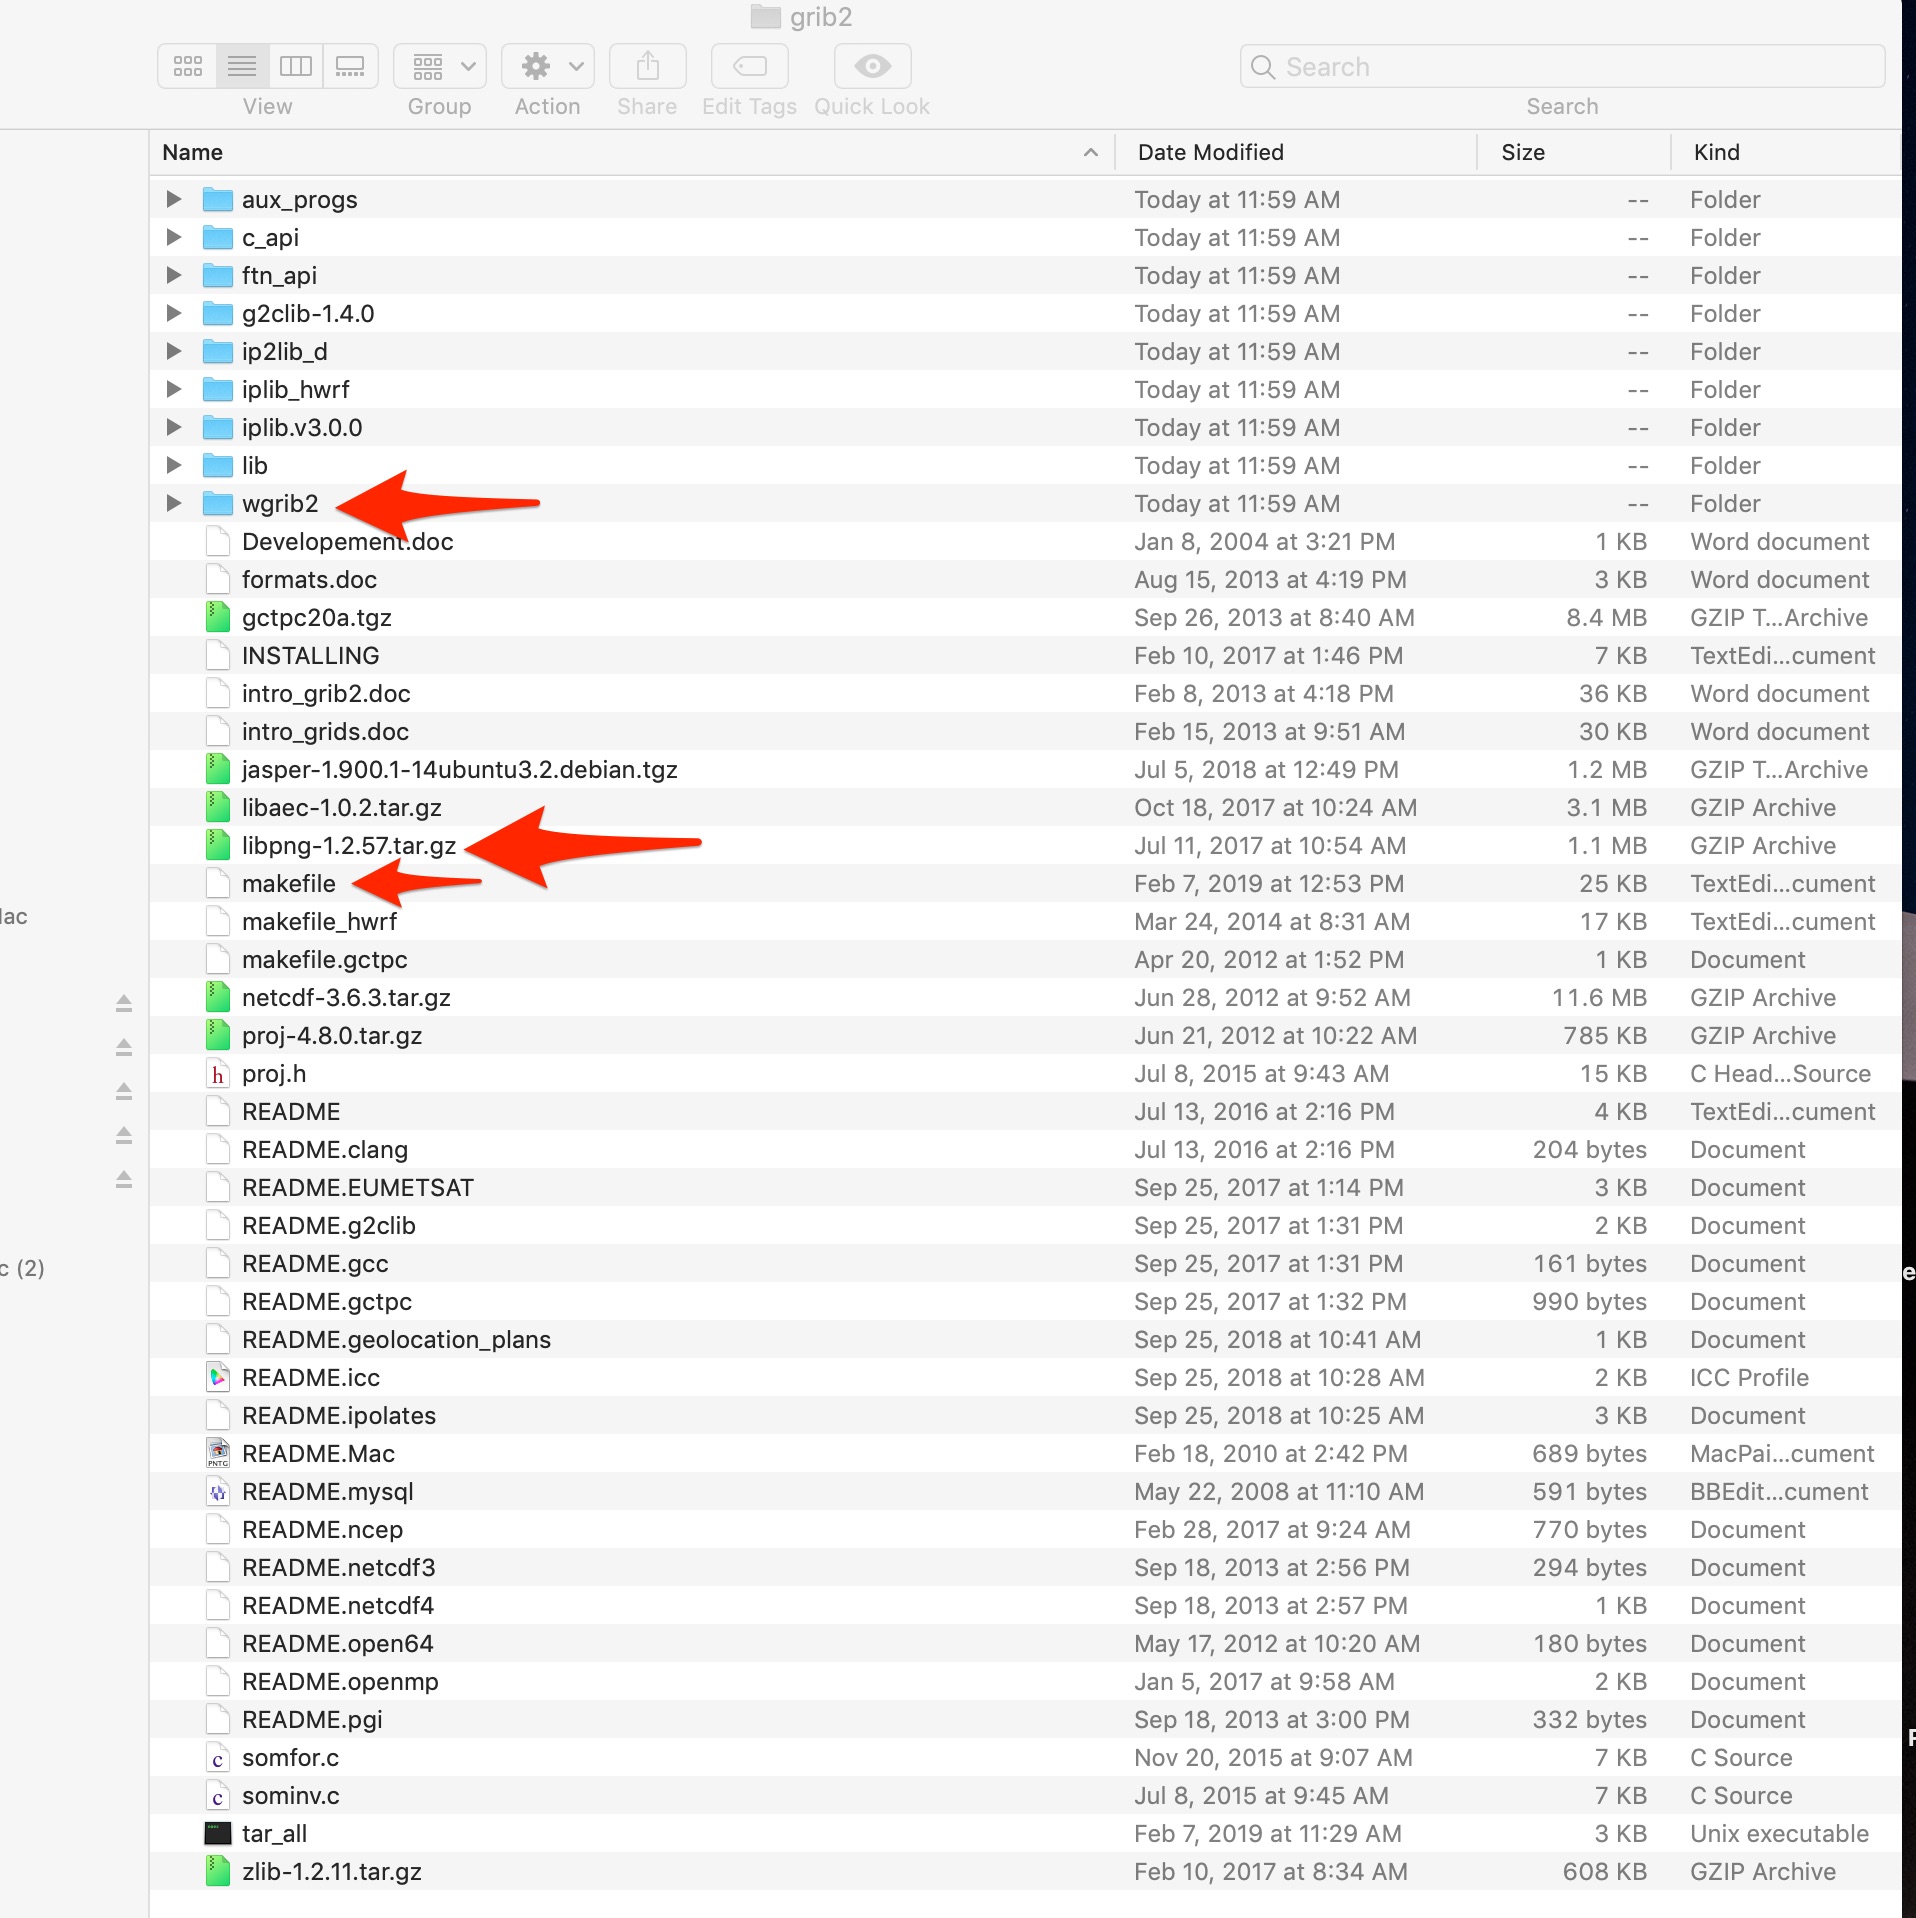
The arrows point to key files that we will be modifying to get this to install. Let’s first work on the makefile (as shown with the arrow.)
Using a text editor, open the file called makefile in this folder. You can use TextEdit or any simple text editor. (I’m using a program called Atom which shows the line numbers. BBedit is also a good choice. )
Please note that the line numbers may be different in newer versions.
This makefile needs to edited. See the areas shown below:
 The following changes need to be made:
Find the lines shown (lines 104 and 105) and uncomment the lines (remove the preceding hashtag). You will change them using your text editor from this:
#export CC=gcc
#export FC=gfortran
to this:
export CC=gcc-12
export FC=gfortran-12
Notice that I am including the version number (gcc-12) (gfortran-12) that we saw in your usr/local/bin directory in the earlier part of these instructions. (If your version is different, use the one that you have, e.g. “gcc-11” and “gfortran-11”)
Additionally, I found that we need to edit another parameter in the makefile, not mentioned in other online tutorials for the Mac. The text is shown in the above graphic of the opened makefile (line 134)
Edit this using your text editor and change this:
USE_PNG=1
to this:
USE_PNG=0
There are two more changes we need to make.
Find the line (line #666; it’s far down. Use your text editor search to find it in the file; Search on the word “.darwin”)

# for OSX
# export LDFLAGS="-L${lib}" && cd "${pngdir}" && export CPPFLAGS="${wCPPFLAGS}" && ${MAKE} -f scripts/makefile.darwin
and just uncomment it (remove the hashtag) so that it looks like this:
# for OSX
  export LDFLAGS="-L${lib}" && cd "${pngdir}" && export CPPFLAGS="${wCPPFLAGS}" && ${MAKE} -f scripts/makefile.darwin
Also, below these lines (line 668-669), you need to ADD a hashtag (#) to comment (inactivate) the next line.
Change this:
# for everybody else
export LDFLAGS="-L${lib}" && cd "${pngdir}" && export CFLAGS="-DPNG_USER_WIDTH_MAX=200000000L -I${cwd}/include" && ./configure --disable-shared --prefix=${cwd} && ${MAKE} check install
to the following: (Simply add a hashtag, as shown in orange)
# for everybody else
# export LDFLAGS="-L${lib}" && cd "${pngdir}" && export CFLAGS="-DPNG_USER_WIDTH_MAX=200000000L -I${cwd}/include" && ./configure --disable-shared --prefix=${cwd} && ${MAKE} check install
We’ve made the necessary changes in the makefile. Select Save from your text editor menu to SAVE the changes.
Editing the libpng-1.2.59.tar.gz
Now, we need to edit a compilation library that’s in the same folder as the the makefile we just worked on. The file is:
libpng-1.2.59.tar.gz
(some of my graphics show version 1.2.57; the latest is v 1.2.59)
We’re going to do it initially with Terminal to untar the tarball.
You might want to quit and then to restart Terminal again to make sure you’re in the correct directory. After restarting Terminal, enter:
cd ~/Desktop/grib2
Then enter
tar -xvf libpng-1.2.59.tar.gz
We can make the changes we need to make with the Terminal text editor, nano, but I think it’s easier for Mac users to just work with the file using text editor. So quit Terminal.
Go to the Finder Desktop and find the new folder that was created inside the grib2 folder (after the tar command) called libpng-1.2.59 (
/Desktop/grib2/libpng-1.2.59/ :
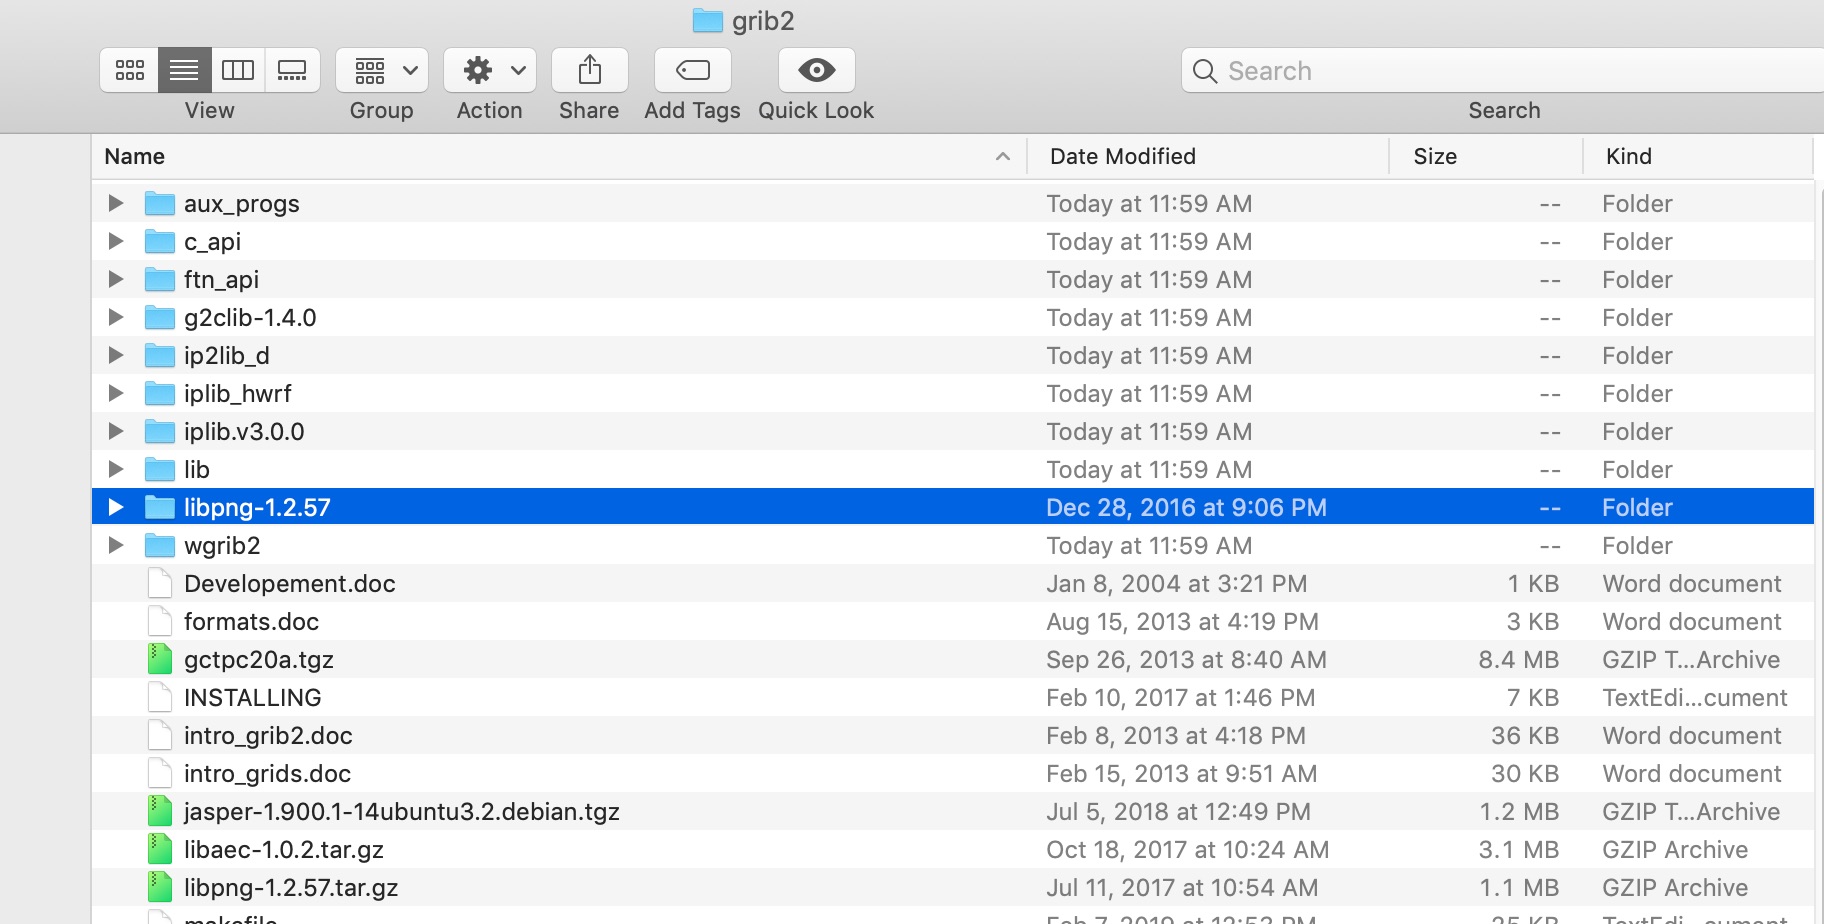 Open that folder (libpng-1.2.59) to find the scripts folder
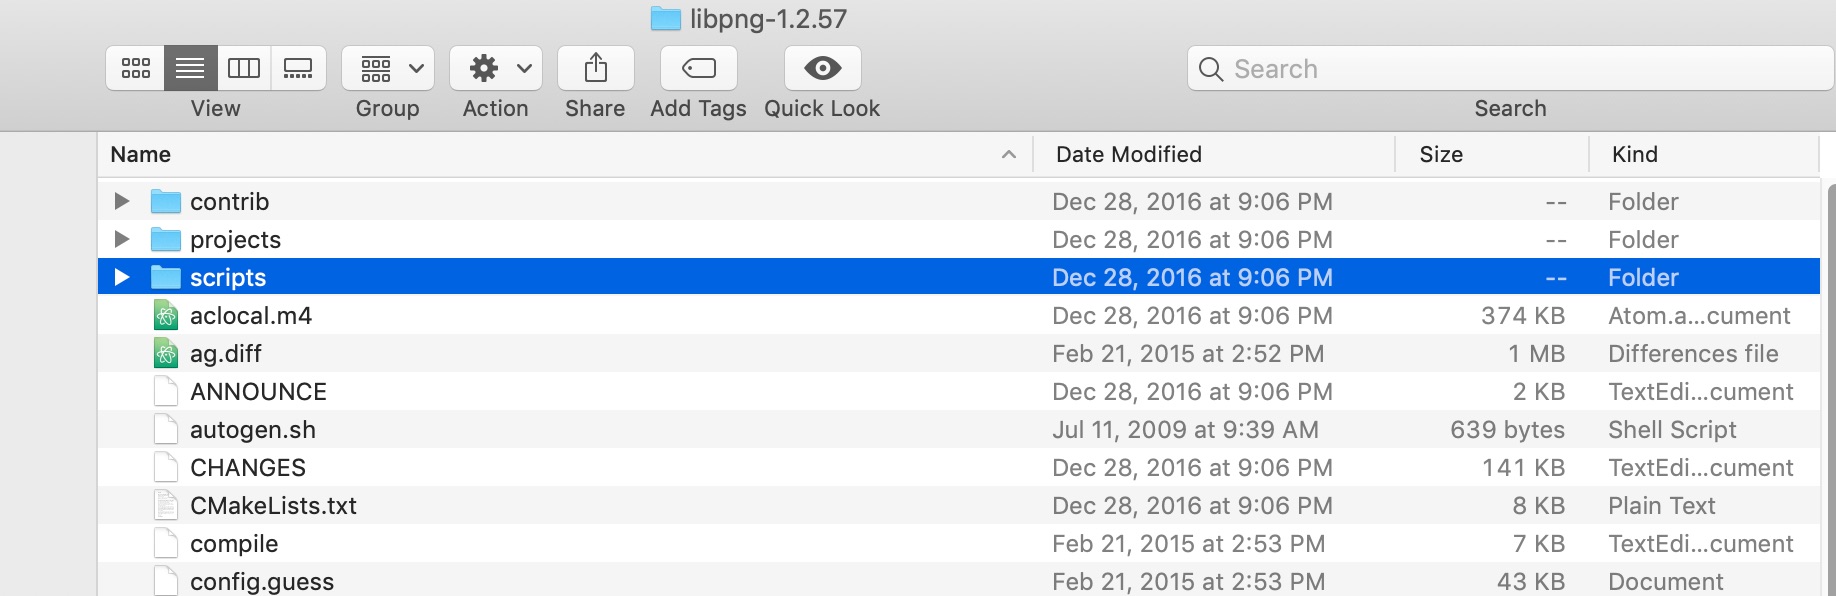 Inside the scripts folder is a file called makefile.darwin:
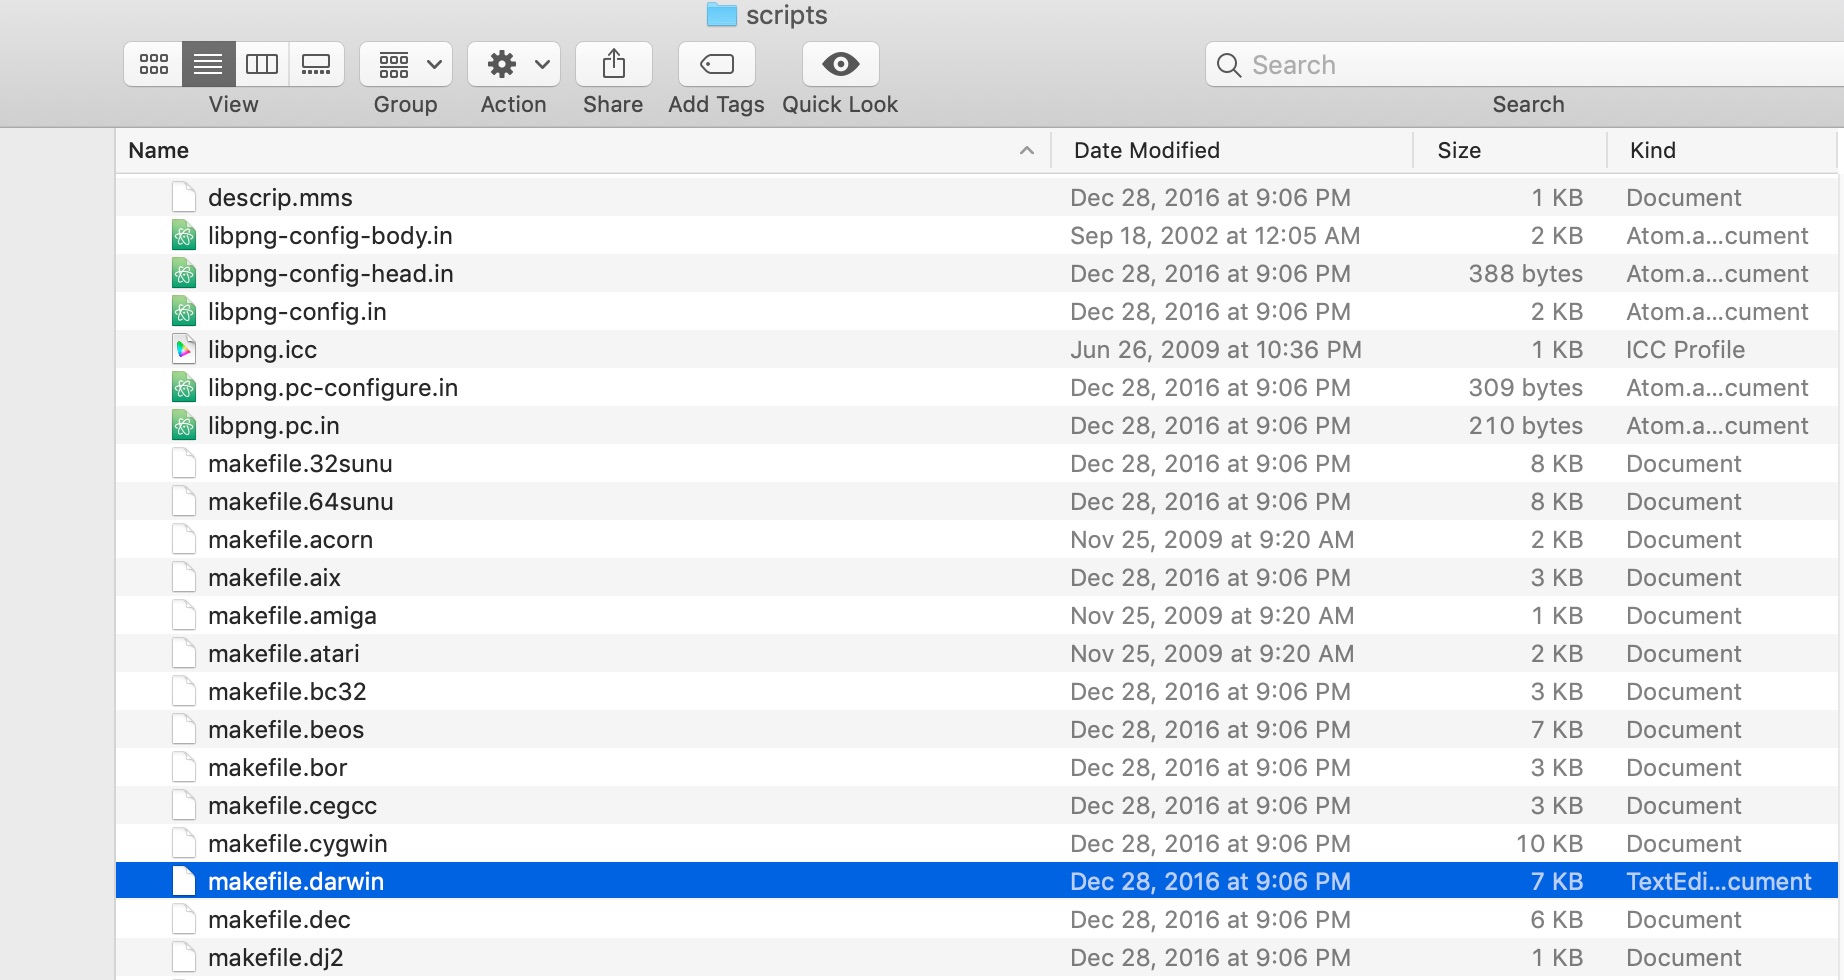 Let’s edit this makefile.darwin with your TextEditor.
Using the search in TextEditor, find the line CC=cc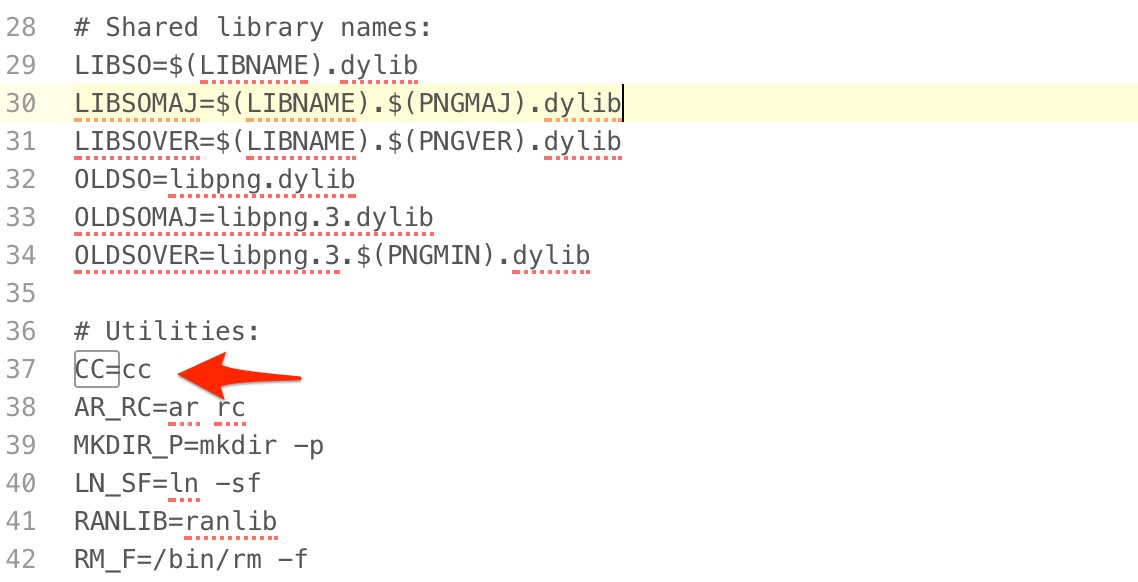 Change:
CC=cc
to:
CC=gcc-12
Notice I’m using the version number.
Save this change with your TextEditor save command.
Now we’re going to re-tar this file back to a compressed file.
Start Terminal. At the prompt, enter:
cd ~/Desktop/grib2/
Then enter:
tar -cf libpng-1.2.59.tar libpng-1.2.59
Then enter:
gzip libpng-1.2.59.tar
You will see the following:
libpng-1.2.59.tar.gz already exists -- do you wish to overwrite (y or n)?
Type y to overwrite the file.
Congratulations, we’re almost there. We’re now going to move a copy of the grib2 folder into where it needs to be to be compiled.
Close the grib2 folder on your Desktop.
Select the grib2 folder on your Desktop to highlight it, then select COPY from the Edit Menu to COPY the grib2 folder.
Then, Using the Finder “Go” menu, select Go to Folder…
Enter :
/usr/local/
This will open a normally hidden folder (directory) called /usr/local/ in the Finder.
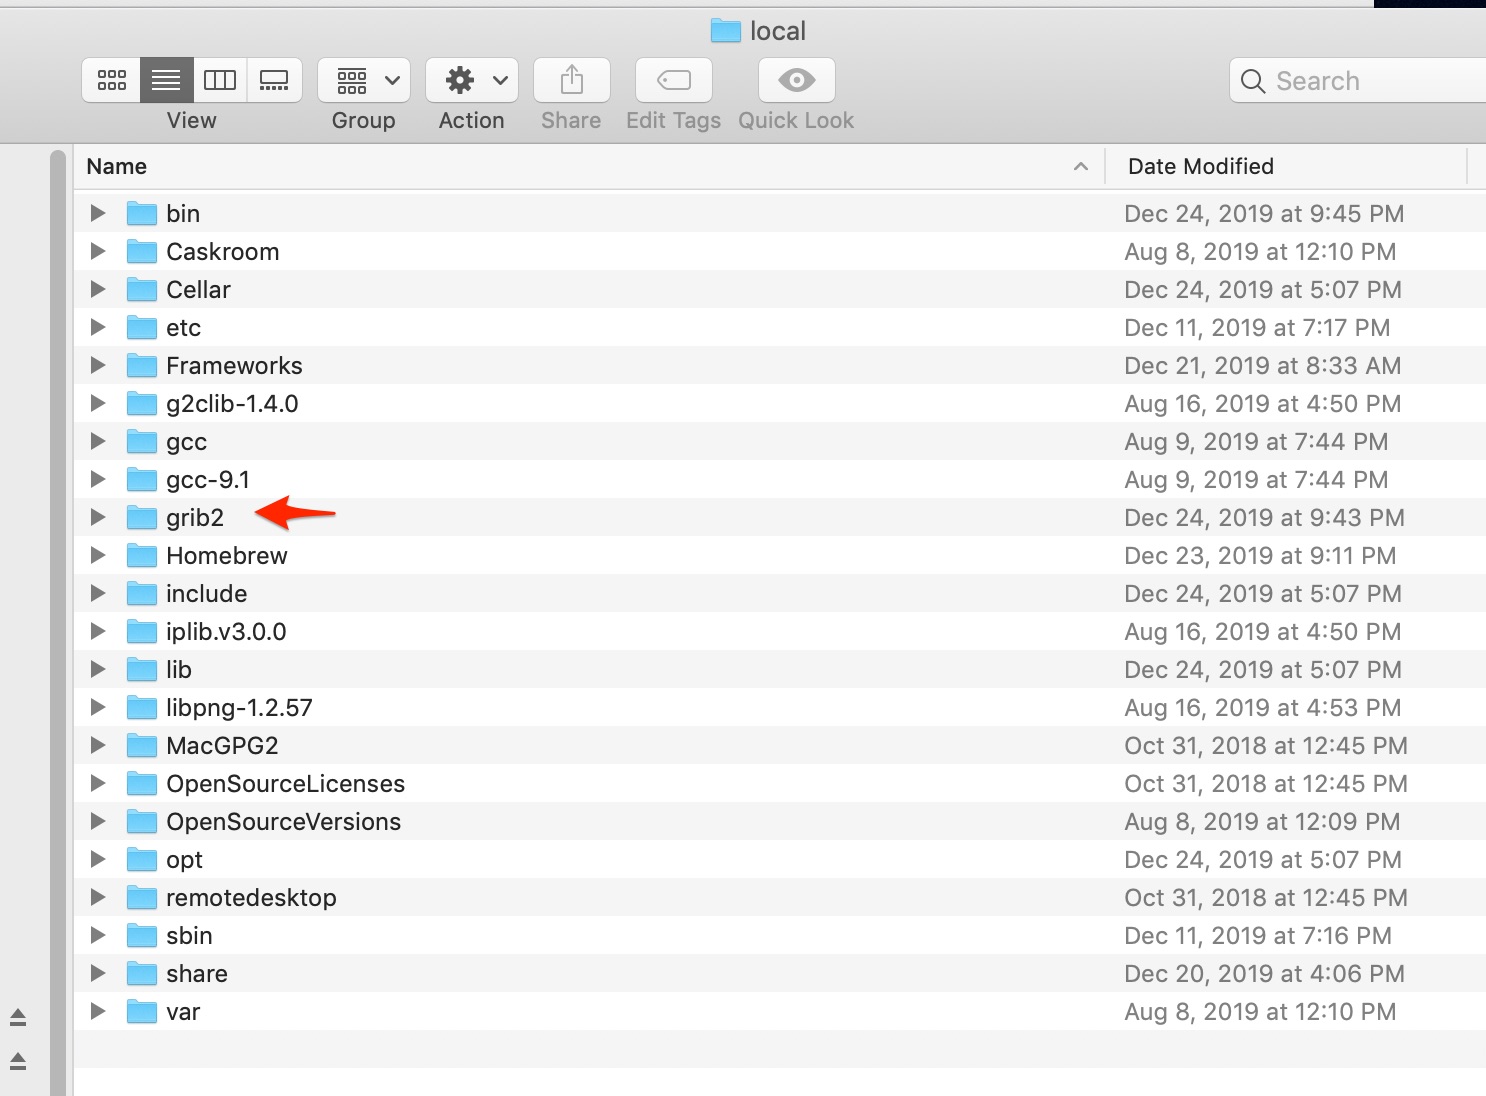
Using the Finder Edit menu, PASTE the grib2 folder you’ve previously copied into your /usr/local/ directory
(Important- Don’t drag the folder into /usr/local/. Use a copy of the the grib2 folder you modified on your desktop. If you run into problems compiling, you can go back and use another copy of your grib2 folder on your Desktop to without having to make all the make file script edits again. )
After pasting, your /usr/local folder should look like this:
 Next we are going to alter the permissions of this grib2 folder and its contents. We could do this quicker with Terminal and the chmod command, but let’s do it the Mac way.
Select the grib2 folder. Right click to Get Info In the Get Info window: 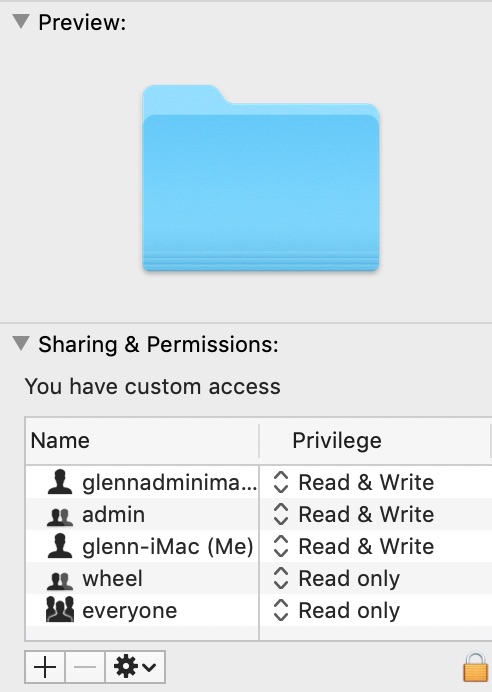 Unlock the padlock, then using the plus symbol, add the administrator and make it Read & Write.
Using the gearwheel drop down menu, select “apply to enclosed items” from the dropdown. Close the padlock to save.
We’ve done the changes needed. In doing it this way, you should still have copy of the grib2 folder on your Desktop with all of the changes we’ve made. We can use this again and copy it to the local folder if we find it doesn’t compile right.
Installing wgrib2 Part 2: Compiling wgrib2
Ok, the now the moment we’ve been waiting for.
Remember, you need to be an Administrator of your computer for this to work.
Boot up Terminal.
Enter superuser mode using the su command and your administrator username. It will ask for your administrator password.
su yourcomuteradministratorname
cd /usr/local/grib2/
Now use the “make” command as a superuser.
sudo make
If everything is going well, you should see Terminal display the progress of the compilation. It may take several minutes.
If no errors occur at the end, you did it!
To make wgrib2 easier to use (while you’re still in the grib2 directory), enter:
ln -s ~/local/grib2/wgrib2/wgrib2 ~/local/bin
(Update: If the above ln -s command gives an error, try this command below ):
ln -s /usr/local/grib2/wgrib2/wgrib2 /usr/local/bin
You don’t need to remain as an Administrator to use wgrib2.
How to use wgrib2:
Following installation, you can check that wgrib2 is installed by the terminal command—
which wgrib2
To see wgrib2 in action, use the terminal command on any .grib2 file you have to see its message contents—
wgrib2 -s mygribfile.grib2


Use the tips found here to use wgrib2— https://www.ftp.cpc.ncep.noaa.gov/wd51we/wgrib2/tricks.cheap
Has
Questions or comments? Use the Feedback form to email me.